Глава 9. Installing using anaconda
This chapter describes an installation using the graphical user interface of anaconda.
9.1. The Text Mode Installation Program User Interface
We recommend that you install Fedora using the graphical interface. If you are installing Fedora on a system that lacks a graphical display, consider performing the installation over a VNC connection – see
Глава 14, Installing Through VNC. If
anaconda detects that you are installing in text mode on a system where installation over a VNC connection might be possible,
anaconda asks you to verify your decision to install in text mode even though your options during installation are limited.
If your system has a graphical display, but graphical installation fails, try booting with the
xdriver=vesa option – refer to
Глава 11, Boot Options
Installing in text mode does not prevent you from using a graphical interface on your system once it is installed.
Apart from the graphical installer, anaconda also includes a text-based installer.
If one of the following situations occurs, the installation program uses text mode:
While text mode installations are not explicitly documented, those using the text mode installation program can easily follow the GUI installation instructions. However, because text mode presents you with a simpler, more streamlined installation process, certain options that are available in graphical mode are not also available in text mode. These differences are noted in the description of the installation process in this guide, and include:
нестандартные схемы хранения данных (LVM, RAID, FCoE, zFCP, iSCSI);
изменение стандартной схемы разделов;
изменение конфигурации загрузчика;
выбор пакетов в процессе установки;
configuring the installed system with firstboot
Not every language supported in graphical installation mode is also supported in text mode. Specifically, languages written with a character set other than the Latin or Cyrillic alphabets are not available in text mode. If you choose a language written with a character set that is not supported in text mode, the installation program will present you with the English versions of the screens.
9.1.1. Using the Keyboard to Navigate
Navigation through the installation dialogs is performed through a simple set of keystrokes. To move the cursor, use the Left, Right, Up, and Down arrow keys. Use Tab, and Shift-Tab to cycle forward or backward through each widget on the screen. Along the bottom, most screens display a summary of available cursor positioning keys.
To "press" a button, position the cursor over the button (using Tab, for example) and press Space or Enter. To select an item from a list of items, move the cursor to the item you wish to select and press Enter. To select an item with a checkbox, move the cursor to the checkbox and press Space to select an item. To deselect, press Space a second time.
Pressing F12 accepts the current values and proceeds to the next dialog; it is equivalent to pressing the OK button.
Unless a dialog box is waiting for your input, do not press any keys during the installation process (doing so may result in unpredictable behavior).
9.2. The Graphical Installation Program User Interface
If you have used a graphical user interface (GUI) before, you are already familiar with this process; use your mouse to navigate the screens, click buttons, or enter text fields.
You can also navigate through the installation using the keyboard. The Tab key allows you to move around the screen, the Up and Down arrow keys to scroll through lists, + and - keys expand and collapse lists, while Space and Enter selects or removes from selection a highlighted item. You can also use the Alt+X key command combination as a way of clicking on buttons or making other screen selections, where X is replaced with any underlined letter appearing within that screen.
9.2.1. Screenshots during installation
Anaconda allows you to take screenshots during the installation process. At any time during installation, press Shift+Print Screen and anaconda will save a screenshot to /root/anaconda-screenshots.
If you are performing a Kickstart installation, use the
autostep --autoscreenshot option to generate a screenshot of each step of the installation automatically. Refer to
Раздел 15.3, «Creating the Kickstart File» for details of configuring a Kickstart file.
9.2.2. A Note about Virtual Consoles
The Fedora installation program offers more than the dialog boxes of the installation process. Several kinds of diagnostic messages are available to you, as well as a way to enter commands from a shell prompt. The installation program displays these messages on five virtual consoles, among which you can switch using a single keystroke combination.
A virtual console is a shell prompt in a non-graphical environment, accessed from the physical machine, not remotely. Multiple virtual consoles can be accessed simultaneously.
These virtual consoles can be helpful if you encounter a problem while installing Fedora. Messages displayed on the installation or system consoles can help pinpoint a problem. Refer to
Таблица 9.1, «Console, Keystrokes, and Contents» for a listing of the virtual consoles, keystrokes used to switch to them, and their contents.
Generally, there is no reason to leave the default console (virtual console #6) for graphical installations unless you are attempting to diagnose installation problems.
Таблица 9.1. Console, Keystrokes, and Contents
|
console
|
keystrokes
|
contents
|
|---|
|
1
|
Ctrl+alt+f1
|
graphical display
|
|
2
|
Ctrl+alt+f2
|
shell prompt
|
|
3
|
Ctrl+alt+f3
|
install log (messages from installation program)
|
|
4
|
Ctrl+alt+f4
|
system-related messages
|
|
5
|
Ctrl+alt+f5
|
other messages
|
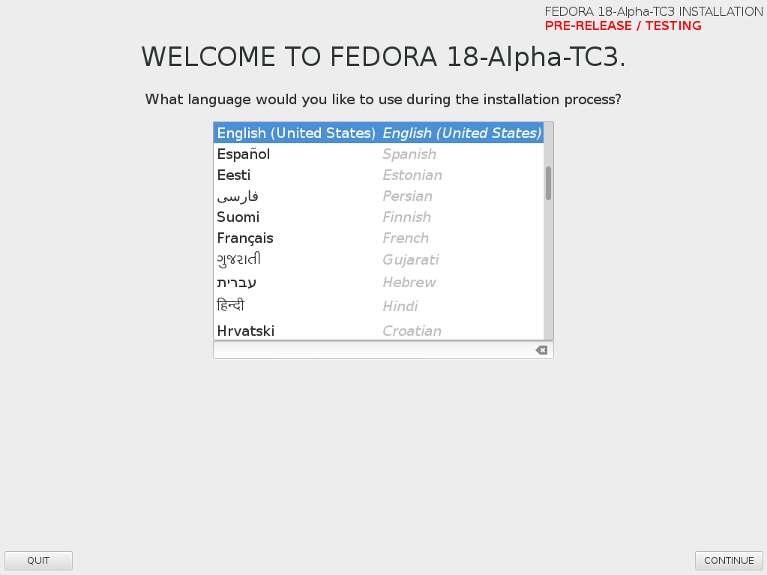
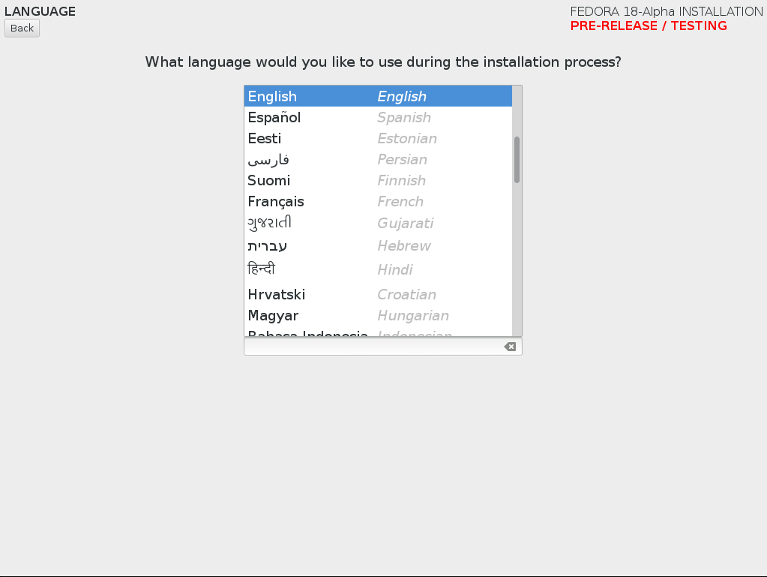
At the Welcome screen, use your mouse to select the language (for example, English (United States)) you would prefer to use for the installation and as the system default.
Alternatively, type your preferred language into the search box (refer to the figure below).
Once you have made your selection, click Continue.
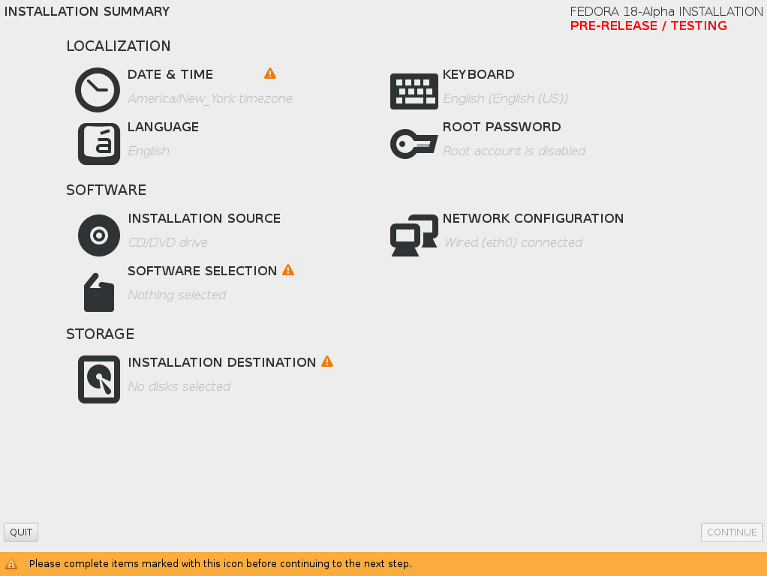
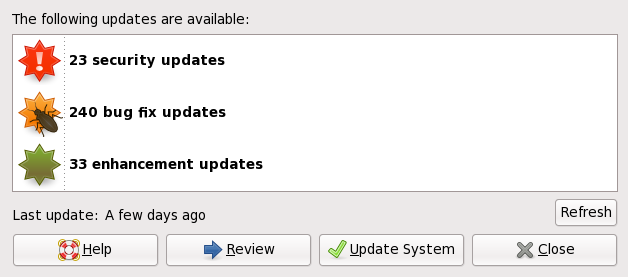
9.4. The Pre-Installation Hub
The Pre-Installation Hub is the central screen for setting up an installation.
Instead of directing you through consecutive screens, anaconda allows you to configure your installation in the order you choose.
Use your mouse to select a section. When you have completed configuring a section, or if you would like to complete that section later, click Done.
Sections that still require your attention are marked with a warning symbol. If any required work is outstanding, a note at the bottom of the screen warns you that these sections must be completed before you can continue.
Once all required sections are complete, click Begin Installation.
To cancel the installation, click Quit.
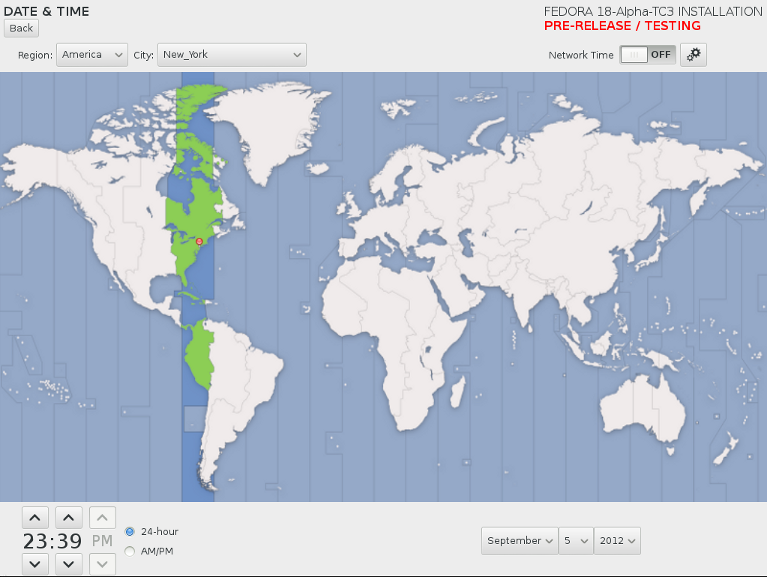
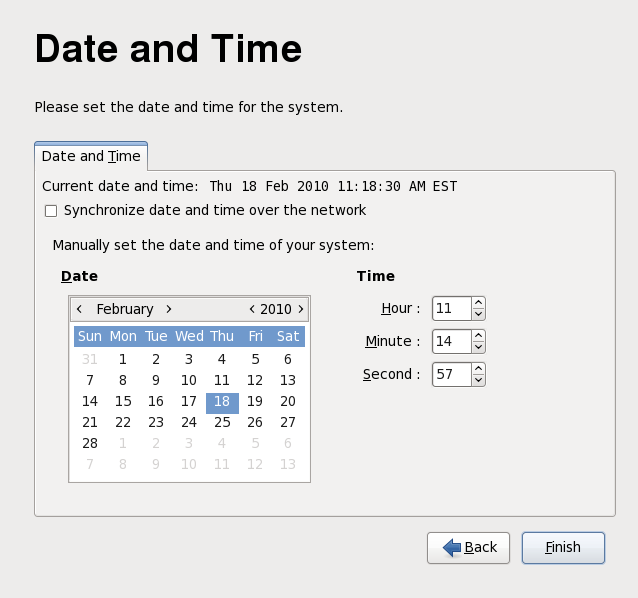
9.5. Configuring date and time
Select Date and Time from the Pre-Installation Hub.
Set your time zone by selecting the city closest to your computer's physical location.
Specify a time zone even if you plan to use NTP (Network Time Protocol) to maintain the accuracy of the system clock.
From here there are two ways for you to select your time zone:
Using your mouse, click on the interactive map to select a specific city. A red pin appears indicating your selection.
You can also scroll through the Region and City drop-down menus at the top of the screen to select your time zone.
To set the date and time using NTP, leave the Network Time switch in the ON position and click the configuration icon to select which NTP servers Fedora should use. To set the date and time manually, move the switch to the OFF position. The system clock should use your time zone selection to display the correct date and time at the bottom of the screen. If they are still incorrect, adjust them manually.
Once you have made your selection, click Done to return to the pre-installation hub.
To change your time zone configuration after you have completed the installation, use the Time and Date Properties Tool.
Type the system-config-date command in a shell prompt to launch the Time and Date Properties Tool. If you are not root, it prompts you for the root password to continue.
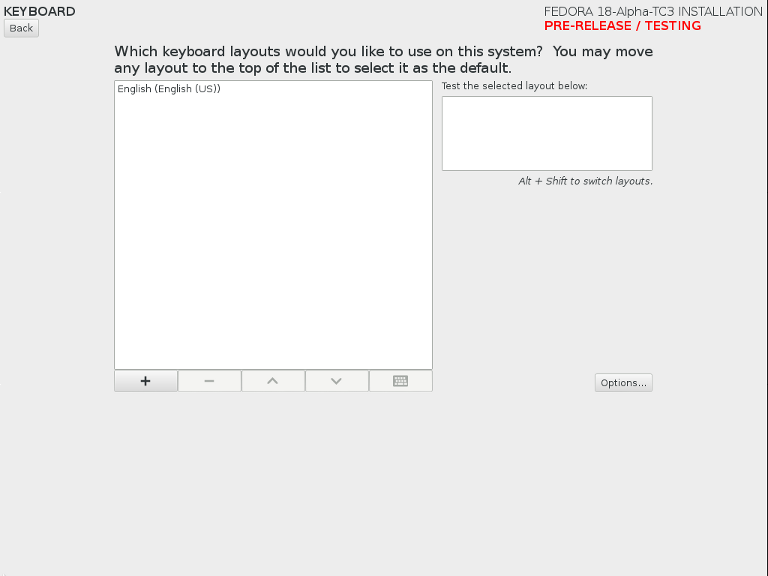
9.6. Keyboard Configuration
Select Keyboard from the Pre-Installation Hub.
The language you selected in
Раздел 9.3, «Language Selection» will be listed in the left-hand pane and serves as the default keyboard layout. To add additional layouts for other languages, click the
+ button and select from the list. Click the
- button to delete layouts. Use the arrow buttons to arrange the layouts in order of preference.
For a visual preview of the keyboard layout, select it and click the keyboard button. To test a layout, select it and then use the mouse to click inside the text box at the right. Type some text to confirm that your selection functions correctly.
If you choose multiple keyboard layouts, you will be able to toggle between keyboard layouts in Fedora using the Alt+Shift keystroke combination. To choose a different combination, click Options to open the Layout Switching Options dialog. Choose a combination from the list by selecting its check box.
Once you have made your selection, click Done to return to the pre-installation hub.
Fedora includes support for more than one keyboard layout for many languages. In particular, most European languages include a latin1 option, which uses dead keys to access certain characters, such as those with diacritical marks. When you press a dead key, nothing will appear on your screen until you press another key to "complete" the character. For example, to type é on a latin1 keyboard layout, you would press (and release) the ' key, and then press the E key. By contrast, you access this character on some other keyboards by pressing and holding down a key (such as Alt-Gr) while you press the E key. Other keyboards might have a dedicated key for this character.
To change your keyboard layout type after you have completed the installation, use the Keyboard Configuration Tool.
Type the system-config-keyboard command in a shell prompt to launch the Keyboard Configuration Tool. If you are not root, it prompts you for the root password to continue.
The language currently selected for the installation and as the system default is displayed on the Pre-Installation Hub, under Language.
If you need to change the language – perhaps if you accepted the default of English (United States) in error – select Language from the Pre-Installation Hub.
Use your mouse to select the language (for example, English (United States)) you would prefer to use for the installation and as the system default.
Alternatively, type your preferred language into the search box (refer to the figure below).
Once you have made your selection, click Done to return to the Pre-Installation Hub.
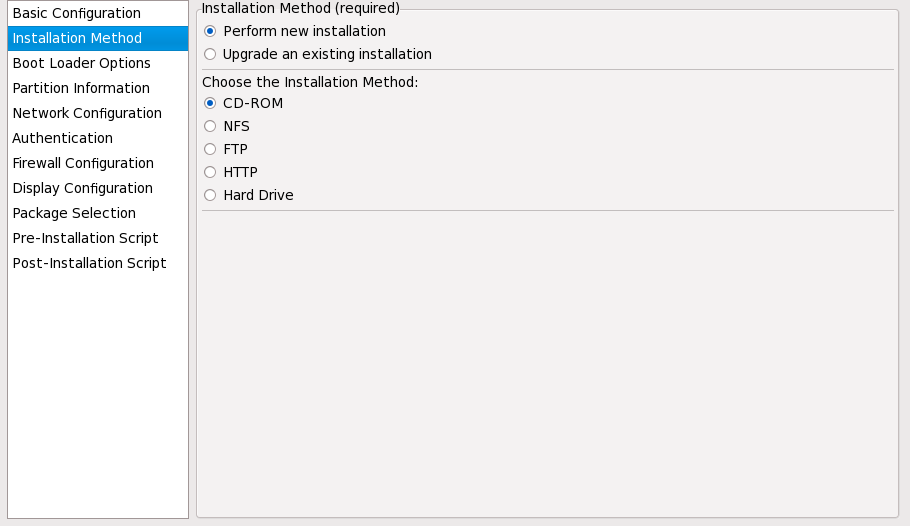
Specify the location you would like to install Fedora from. Choose between an ISO file or a network location.
If you initiated the installation using a full DVD ISO, the installer will detect the ISO and display it under Auto-detected install media. Select the ISO to use it as the installation source.
If an ISO has not been detected automatically, specify a locally-stored ISO file. Click Choose an ISO and browse to the file's location on your system. After selecting an ISO, click Verify to check that the file is suitable for installation.
To specify a network location, choose from the following options in the drop-down menu: Closest mirror, http://, https://, ftp://, and nfs.
Using your selection as the start of the location URL, type the rest into the address box. (If you selected Closest mirror, an address is not required.)
If you choose NFS, the address box will be grayed out. Another box will appear for you to specify any NFS mount options.
To configure a proxy, click Proxy setup unless you are installing via FTP and NFS. Proxies are unavailable for these methods.
Check Enable HTTP proxy and type the URL into the Proxy URL box. If your proxy requires authentication, check Use Authentication and enter a username and password. Click Add.
Check the Updates option if you do not want to install the latest available updates and would prefer to install the default versions from your specified installation source.
Once you have selected your installation source, click Back to return to the Pre-Installation Hub.
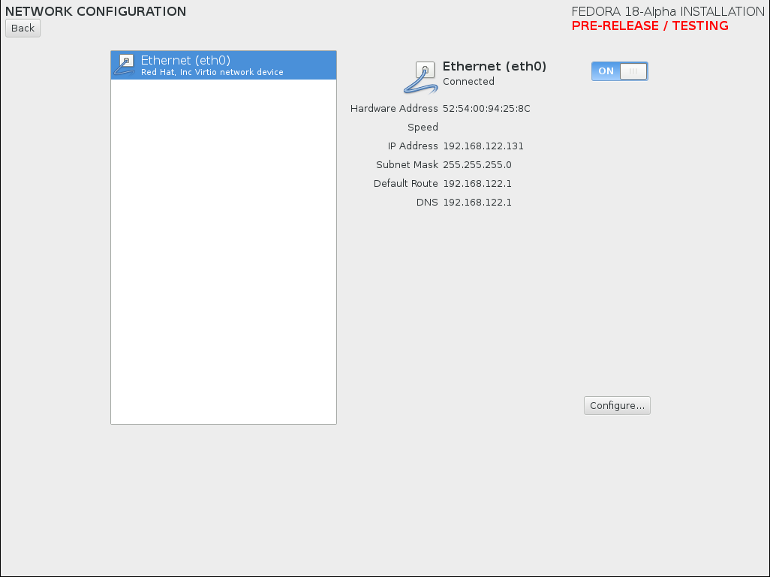
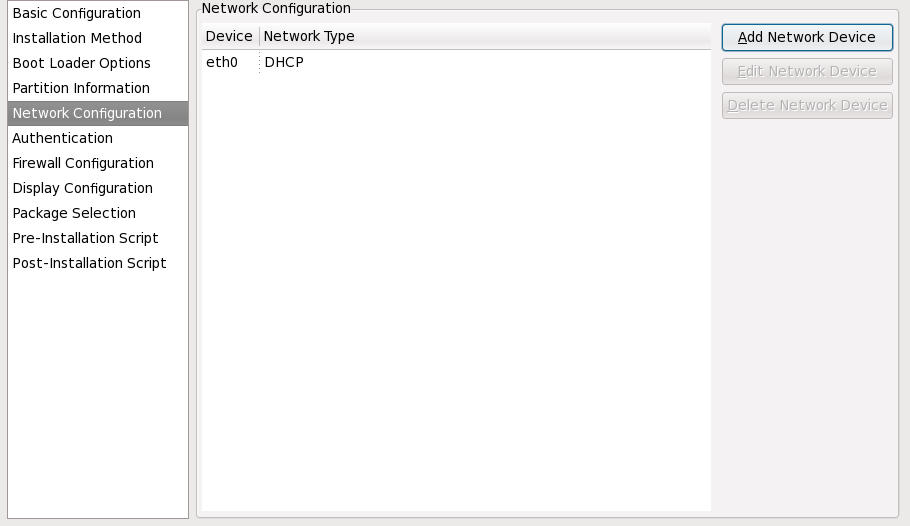
9.9. Network configuration
Появится запрос ввода имени узла либо в виде полностью квалифицированного имени домена, либо в формате узел.домен, либо можно просто указать имя_узла. Многие сети используют протокол DHCP (Dynamic Host Configuration Protocol) для автоматического назначения системе доменного имени. При этом пользователю остается только указать имя узла.
Если система Fedora напрямую подключена к Интернету, примите во внимание правила вашего провайдера. Их обсуждение выходит за рамки этого документа.
The installation program does not configure modems. Configure these devices after installation with the Network utility. The settings for your modem are specific to your particular Internet Service Provider (ISP).
9.9.1. Изменение сетевых подключений
When a Fedora 17 installation boots for the first time, it activates any network interfaces that you configured during the installation process. However, the installer does not prompt you to configure network interfaces on some common installation paths, for example, when you install Fedora from a DVD to a local hard drive.
When you install Fedora from a local installation source to a local storage device, be sure to configure at least one network interface manually if you require network access when the system boots for the first time.
Чтобы изменить настройки сетевых подключений после завершения установки, воспользуйтесь программой настройки сети.
Выполните в приглашении оболочки команду system-config-network для ее запуска. Если вы не являетесь пользователем root, для продолжения будет предложено ввести пароль root.
To configure the selected network connection manually, click the button Configure. A Network Manager dialog appears that allows you to configure the selected connection. The configuration options presented will depend on whether the connection is wired, wireless, mobile broadband, VPN, or DSL. A full description of all configurations possible with NetworkManager is beyond the scope of this guide. This section only details the most typical scenario of how to configure wired connections during installation. Configuration of other types of network is broadly similar, although the specific parameters that you must configure are necessarily different.
When you have finished editing network settings, click
Save to save the new configuration. If you reconfigured a device that was already active during installation, you must restart the device to use the new configuration — refer to
Раздел 9.9.1.6, «Restart a network device».
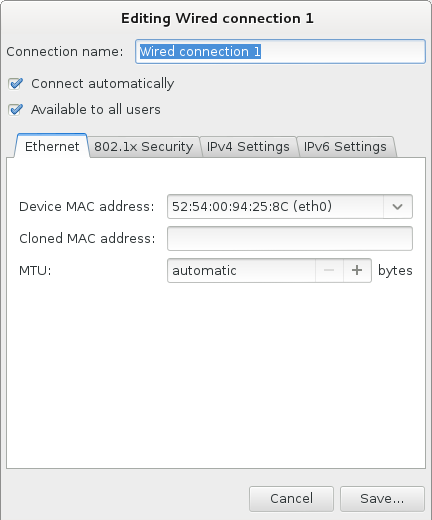
9.9.1.1. Аналогичные параметры для разных типов подключений
Некоторые параметры совпадают для всех типов соединений.
Заполните поле Название соединения.
Select Connect automatically to start the connection automatically when the system boots.
When NetworkManager runs on an installed system, the Available to all users option controls whether a network configuration is available system-wide or not. During installation, ensure that Available to all users remains selected for any network interface that you configure.
9.9.1.2. The Ethernet tab
Use the Ethernet tab to specify or change the media access control (MAC) address for the network adapter, and set the maximum transmission unit (MTU, in bytes) that can pass through the interface either manually or automatically.
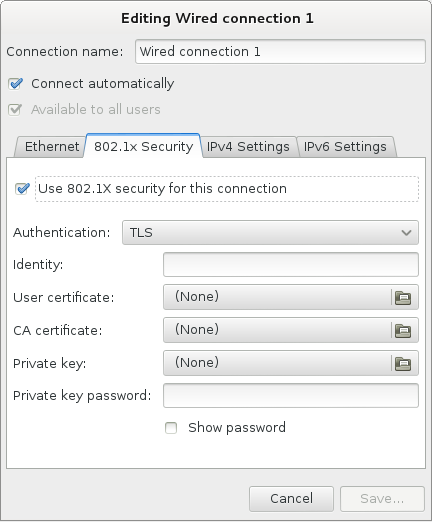
9.9.1.3. Вкладка защиты 802.1x
На вкладке Защита 802.1x можно настроить контроль сетевого доступа в зависимости от порта. Для этого выберите Использовать защиту 802.1X для этого соединения и введите необходимые данные. Параметры настройки включают:
- Аутентификация
Выберите метод аутентификации:
TLS (Transport Layer Security);
Туннельный TLS (TTLS или EAP-TTLS);
Защищенный EAP (PEAP) (Protected Extensible Authentication Protocol).
- Идентификация
Введите данные сервера.
- Сертификат пользователя
Путь к файлу сертификата X.509, закодированному с помощью правил DER (Distinguished Encoding Rules) или PEM (Privacy Enhanced Mail).
- Сертификат CA
Путь к файлу сертификата CA, закодированному с помощью правил DER (Distinguished Encoding Rules) или PEM (Privacy Enhanced Mail).
- Секретный ключ
Путь к файлу секретного ключа, закодированному с помощью правил DER (Distinguished Encoding Rules), PEM (Privacy Enhanced Mail) или PKCS#12 (Personal Information Exchange Syntax Standard).
- Пароль к секретному ключу
Пароль для ключа, заданного в поле Секретный ключ. Отметьте Показывать пароль, чтобы видеть вводимый пароль.
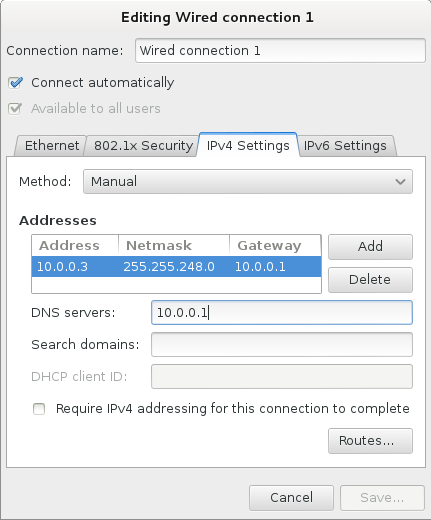
9.9.1.4. The IPv4 Settings tab
На вкладке параметров IPv4 можно изменить настройки существующего соединения.
В меню Профиль выберите настройки, которые будут определяться службой DHCP.
- Автоматически (DHCP)
Параметры IPv4 определяются службой DHCP.
- Автоматические адреса (DHCP)
Адрес IPv4, маска сети и адрес шлюза настраиваются службой DHCP, но серверы имен и домены поиска должны быть настроены вручную.
- Manual
Параметры IPv4 для статической конфигурации определяются вручную.
- Link-Local Only
Интерфейсу будет назначен локальный адрес в диапазоне 169.254/16.
- Общий с другими компьютерами
В этом случае система будет предоставлять доступ к сети для других компьютеров. Интерфейсу будет назначен адрес в диапазоне 10.42.x.1/24. Серверы DHCP и DNS будут запущены, а при подключении интерфейса к системе с NAT (Network Address Translation) будут использоваться настройки по умолчанию.
- Не указывать адрес
IPv4 отключен.
При выборе профиля, для которого необходимо настроить параметры вручную, в поле адреса укажите IP-адрес интерфейса, маску сети и шлюз. Для добавления и удаления адресов используются одноименные кнопки. В поле Серверы DNS введите список серверов, разделив их запятой, а в поле Домены поиска перечислите домены, которые будут участвовать в поиске сервера имен.
Или можно ввести имя сетевого соединения в поле ID клиента DHCP. Значение должно быть уникально в пределах подсети.
Отмените выбор Требовать адресацию IPv4 для этого соединения, чтобы разрешить это соединение в сети IPv6. Используется в случаях, если настройка IPv4 завершилась неудачей, а настройка IPv6 удалась.
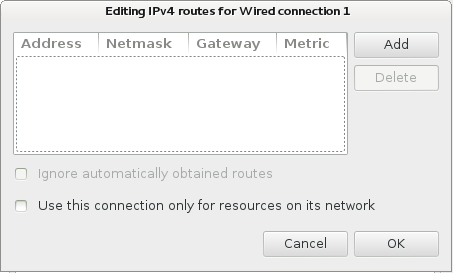
9.9.1.4.1. Изменение маршрутов IPv4
Red Hat Enterprise Linux выполняет автоматическую настройку маршрутов на основе IP-адресов устройства. Чтобы добавить дополнительные маршруты, нажмите кнопку Маршруты. Появится диалог Изменение маршрутов IPv4.
Click Add to add the IP address, netmask, gateway address, and metric for a new static route.
Выберите Игнорировать автоматически полученные маршруты, чтобы использовать только заданные здесь маршруты.
Select Use this connection only for resources on its network to restrict connections only to the local network.
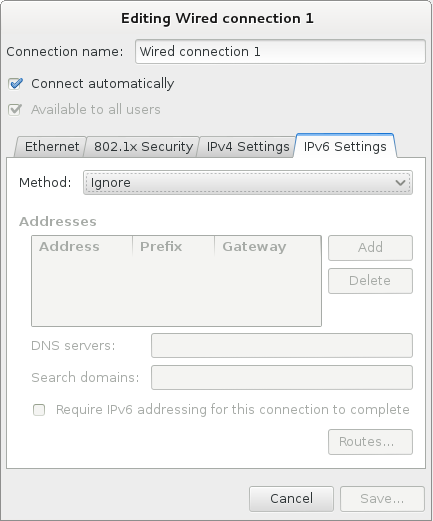
9.9.1.5. Вкладка параметров IPv6
На вкладке Параметры IPv6 можно изменить настройки IPv6 для выбранного соединения.
В меню Профиль выберите настройки, которые будут определяться службой DHCP.
- Игнорировать
Игнорировать IPv6 для заданного соединения.
- Автоматически
NetworkManager uses router advertisement (RA) to create an automatic, stateless configuration.
- Автоматически, только адреса
NetworkManager uses RA to create an automatic, stateless configuration, but DNS servers and search domains are ignored and must be configured manually.
- Automatic, DHCP only
NetworkManager does not use RA, but requests information from DHCPv6 directly to create a stateful configuration.
- Manual
Параметры IPv6 для статической конфигурации определяются вручную.
- Link-Local Only
Интерфейсу будет назначен локальный адрес с префиксом fe80::/10.
При выборе профиля, для которого необходимо настроить параметры вручную, в поле адреса укажите IP-адрес интерфейса, маску сети и шлюз. Для добавления и удаления адресов используются одноименные кнопки. В поле Серверы DNS введите список серверов, разделив их запятой, а в поле Домены поиска перечислите домены, которые будут участвовать в поиске сервера имен.
Или можно ввести имя сетевого соединения в поле ID клиента DHCP. Значение должно быть уникально в пределах подсети.
Отмените выбор Требовать адресацию IPv6 для этого соединения, чтобы разрешить это соединение в сети IPv4. Используется в случаях, если настройка IPv6 завершилась неудачей, а настройка IPv4 удалась.
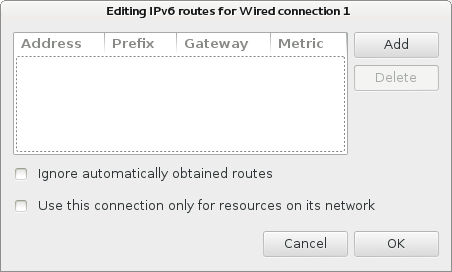
9.9.1.5.1. Изменение маршрутов IPv6
Fedora configures a number of routes automatically based on the IP addresses of a device. To edit additional routes, click the Routes button. The Editing IPv6 routes dialog appears.
Click Add to add the IP address, netmask, gateway address, and metric for a new static route.
Select Use this connection only for resources on its network to restrict connections only to the local network.
9.9.1.6. Restart a network device
If you reconfigured a network that was already in use during installation, you must disconnect and reconnect the device in
anaconda for the changes to take effect.
Anaconda uses
interface configuration (ifcfg) files to communicate with
NetworkManager. A device becomes disconnected when its ifcfg file is removed, and becomes reconnected when its ifcfg file is restored, as long as
ONBOOT=yes is set. Refer to the
Fedora Deployment Guide available from
http://docs.fedoraproject.org/en-US/index.html for more information about interface configuration files.
Press Ctrl+Alt+F2 to switch to virtual terminal tty2.
Move the interface configuration file to a temporary location:
mv /etc/sysconfig/network-scripts/ifcfg-device_name /tmp
where device_name is the device that you just reconfigured. For example, ifcfg-eth0 is the ifcfg file for eth0.
The device is now disconnected in anaconda.
Open the interface configuration file in the vi editor:
vi /tmp/ifcfg-device_name
Verify that the interface configuration file contains the line ONBOOT=yes. If the file does not already contain the line, add it now and save the file.
Exit the vi editor.
Move the interface configuration file back to the /etc/sysconfig/network-scripts/ directory:
mv /tmp/ifcfg-device_name /etc/sysconfig/network-scripts/
The device is now reconnected in anaconda.
Press Ctrl+Alt+F6 to return to anaconda.
При установке Fedora в текстовом режиме выбор пакетов для установки будет недоступен. Установщик автоматически выберет из основной группы пакеты, необходимые для работы системы после завершения процесса установки и обеспечения ее готовности к установке новых пакетов и обновлений. После завершения установки изменить набор пакетов можно с помощью специального приложения добавления и удаления программ.
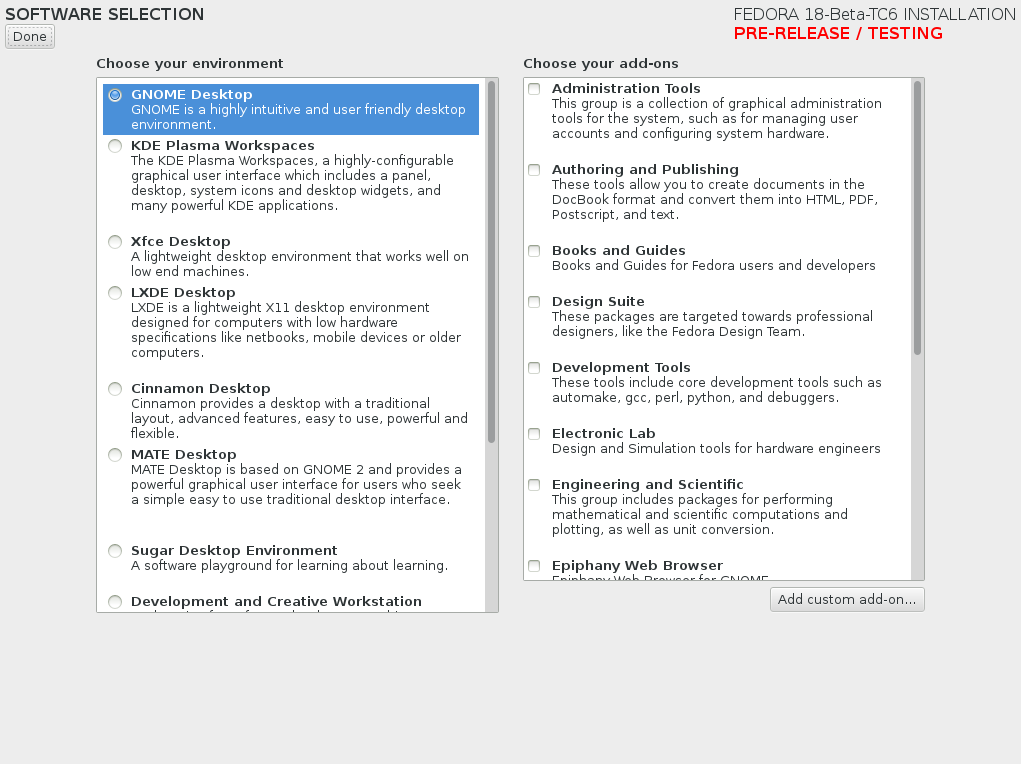
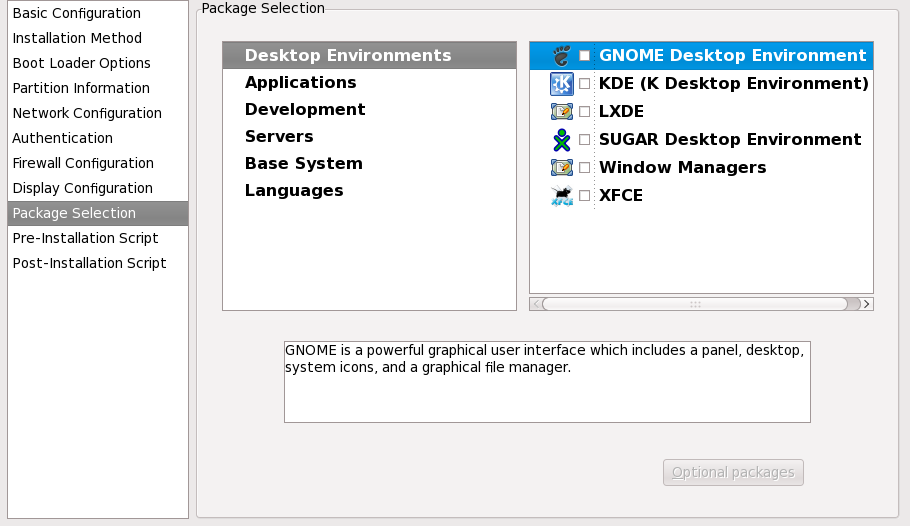
By default, Fedora installs the GNOME Desktop Environment, but in Software Selection you can choose from a range of other environments and customise additional packages to be installed as add-ons. Available environments are listed in the left-hand pane. To select an environment, click the radio button that corresponds to one of the following options:
- Graphical Desktops (multiple options)
Fedora offers a variety of graphical desktop environments, which can be enhanced with add-ons such as the LibreOffice productivity suite, graphical tools such as the GIMP, and multimedia applications. The available environments are:
- Development and Creative Workstation
This option provides the necessary tools to compile software and develop graphics and other content on your Fedora system.
- Web Server
Эта опция позволяет установить веб-сервер Apache.
- Infrastructure Server
This option provides a server for operating network infrastructure services.
- Basic X Window System
This option provides the X Window System without a full graphical desktop environment.
- Minimal Install
This option provides only the packages essential to run Fedora. A minimal installation provides the basis for a single-purpose server or desktop appliance and maximizes performance and security on such an installation.
Fedora will automatically install the base and mandatory packages for the environment you select, but you can select additional package groups, or add-ons, from the right-hand pane. The list of add-ons is refreshed when a new environment is selected. Add-ons range from common utilities such as Administrative Tools and LibreOffice to specialist tools such as Medical Applications and Robotics
To specify add-ons for installation as part of the environment, select the check box next to each add-on.
Once you have selected an environment and any additional packages you may wish to install, click Done to return to the pre-installation hub.
The packages that you select are not permanent. After you boot your system, use the Add/Remove Software tool to either install new software or remove installed packages. To run this tool, from the main menu, select → → . The Fedora software management system downloads the latest packages from network servers, rather than using those on the installation discs.
9.10.1. Installing from Additional Repositories
You can define additional repositories to increase the software available to your system during installation. A repository is a network location that stores software packages along with metadata that describes them. Many of the software packages used in Fedora require other software to be installed. The installer uses the metadata to ensure that these requirements are met for every piece of software you select for installation.
The basic options are:
Репозиторий установки будет выбран автоматически. Он включает программное обеспечение для установочного CD/DVD.
Fedora 17 - i386 содержит полную коллекцию программ Fedora 17 плюс стабильные версии дополнительных программ. При выполнении установки Fedora 17 с набора дисков CD или DVD эта опция не предложит дополнительных функций, но при установке с LiveCD вы получите доступ к широкому диапазону пакетов. Для этого компьютер должен иметь доступ к Интернету.
Репозиторий Fedora 17 - i386 - Updates содержит полную коллекцию пакетов Fedora 17 плюс стабильные версии дополнительных программ. Этот вариант не только установит выбранное программное обеспечение, но и гарантирует наличие последних версий. Для этого компьютер должен иметь доступ к Интернету.
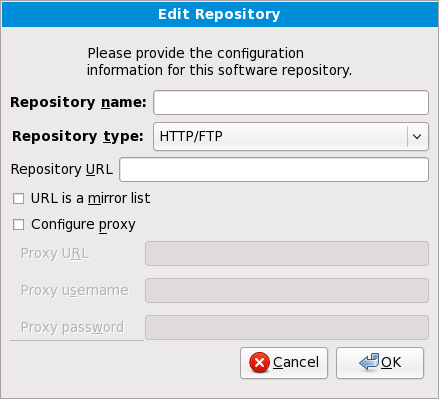
To include software from extra repositories, select Add additional software repositories and provide the location of the repository.
To edit an existing software repository location, select the repository in the list and then select Modify repository.
If you change the repository information during a non-network installation, such as from a Fedora DVD, the installer prompts you for network configuration information.
If you change the repository information during a non-network installation, such as from a Fedora DVD, the installer prompts you for network configuration information.
Select an interface from the drop-down menu.
Click OK.
Anaconda activates the interface that you selected, then starts NetworkManager to allow you to configure the interface.
If you select Add additional software repositories, the Edit repository dialog appears. Provide a Repository name and the Repository URL for its location.
Once you have located a mirror, to determine the URL to use, find the directory on the mirror that contains a directory named repodata.
Once you provide information for an additional repository, the installer reads the package metadata over the network. Software that is specially marked is then included in the package group selection system.
If you choose Back from the package selection screen, any extra repository data you may have entered is lost. This allows you to effectively cancel extra repositories. Currently there is no way to cancel only a single repository once entered.
9.10.2. Core Network Services
Все установки Fedora включают следующие сетевые службы:
centralized logging through syslog
email through SMTP (Simple Mail Transfer Protocol)
network file sharing through NFS (Network File System)
remote access through SSH (Secure SHell)
resource advertising through mDNS (multicast DNS)
The default installation also provides:
network file transfer through HTTP (HyperText Transfer Protocol)
printing through CUPS (Common UNIX Printing System)
remote desktop access through VNC (Virtual Network Computing)
Некоторые автоматизированные процессы в Fedora для отправки отчетов и сообщений системному администратору используют электронную почту. Службы электронной почты, журналирования и печати по умолчанию не принимают подключения из других систем. Fedora устанавливает компоненты совместного доступа NFS, HTTP и VNC, но не активирует их по умолчанию.
Можно настроить систему Fedora так, чтобы она предоставляла службы электронной почты, совместного доступа, журналирования, печати и доступа к удаленному рабочему столу. SSH в Fedora активируется по умолчанию. Для доступа к файлам, расположенным в другой системе, можно использовать NFS без необходимости активации службы совместного доступа NFS.
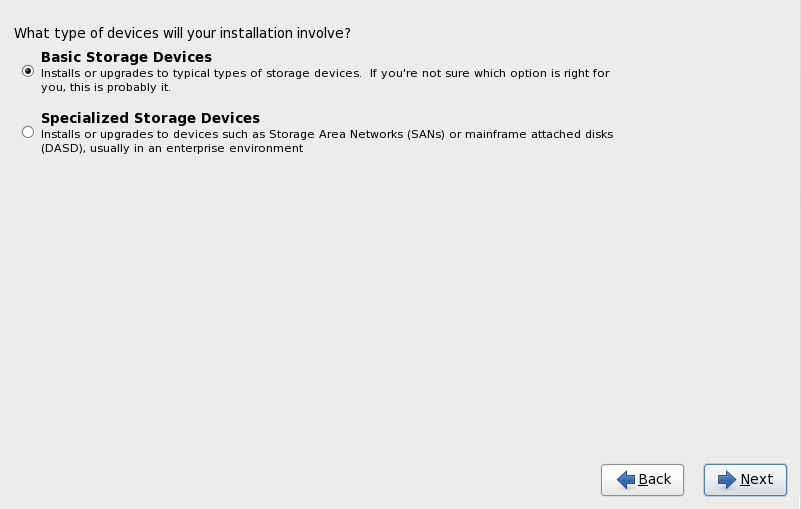
9.11. Устройства хранения
You can install Fedora on a large variety of storage devices. This screen allows you to select either basic or specialized storage devices.
- Basic Storage Devices
Select to install Fedora on the following storage devices:
- Specialized Storage Devices
Select to install Fedora on the following storage devices:
в сети хранения данных (SAN, Storage Area Networks);
Direct access storage devices (DASDs)
на микропрограммные RAID-устройства;
на многопутевые устройства.
Use the option to configure Internet Small Computer System Interface (iSCSI) and FCoE (Fiber Channel over Ethernet) connections.
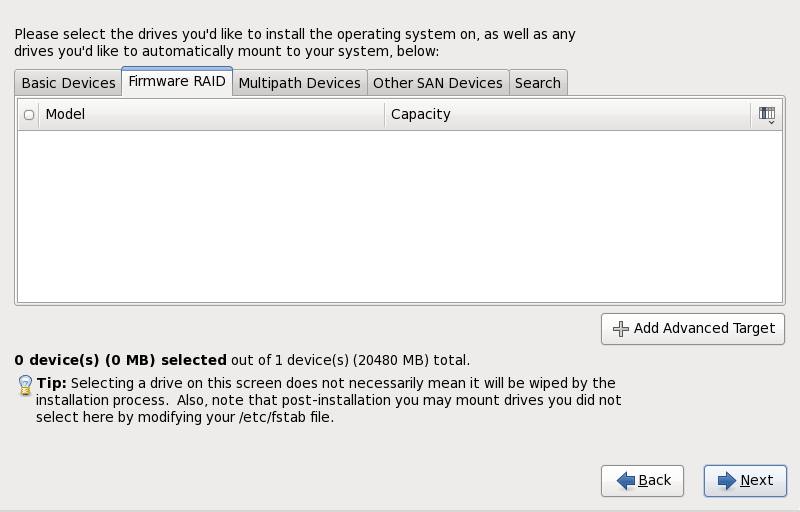
9.11.1. Окно выбора устройств хранения
В этом окне показаны все доступные программе anaconda устройства хранения.
Устройства сгруппированы следующим образом:
- Basic Devices
Это устройства, напрямую подключенные в локальную систему (например, жесткие диски).
- Firmware RAID
Накопители, подключенные к микропрограммному RAID-контроллеру.
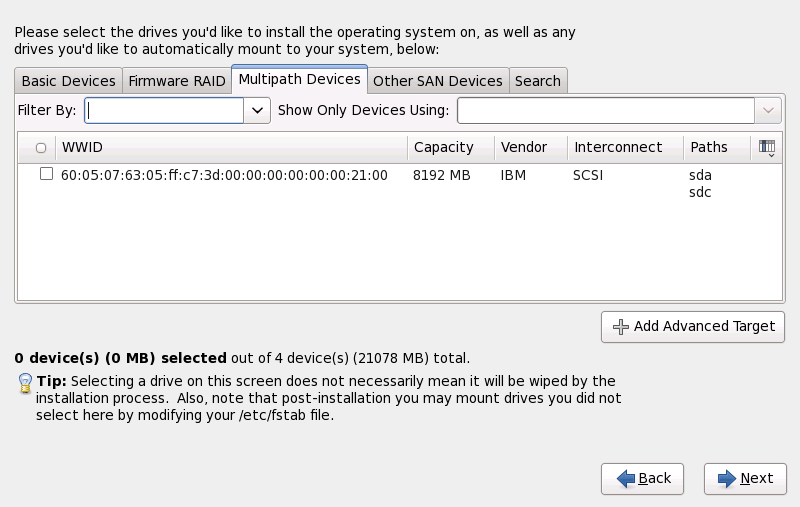
- Multipath Devices
Storage devices accessible through more than one path, such as through multiple SCSI controllers or Fiber Channel ports on the same system.
The installer only detects multipath storage devices with serial numbers that are 16 or 32 characters in length.
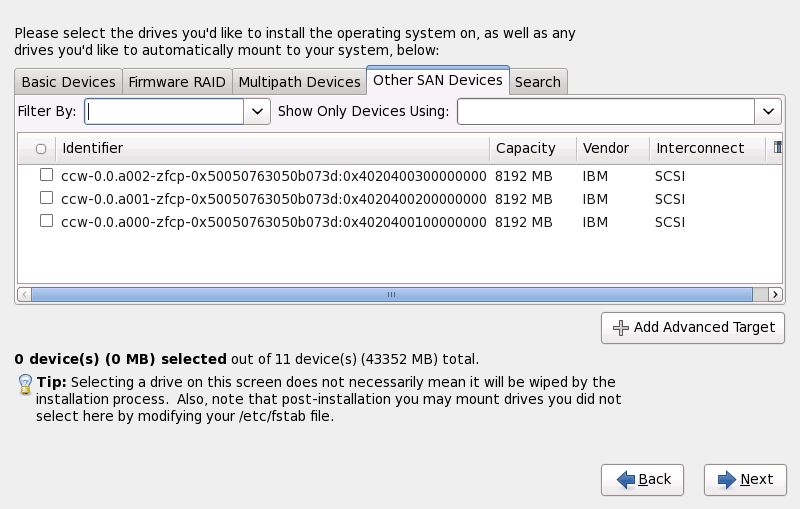
- Other SAN Devices
Любые другие устройства в сети хранения данных.
To assign non-friendly multipath device names, click Device Options and uncheck Use friendly names for multipath devices.
Экран выбора устройств содержит вкладку поиска, где можно отфильтровать устройства хранения по идентификатору WWID (World Wide Identifier), порту, цели или номеру LUN (Logical Unit Number).
На этой вкладке вы увидите раскрывающееся меню, где можно выбрать критерий поиска (порт, цель, LUN, WWID) и соответствующие текстовые поля.
На каждой вкладке будет представлен список обнаруженных программой anaconda устройств и критерии, помогающие их идентифицировать. Справа от заголовков столбцов расположено небольшое раскрывающееся меню, где можно выбрать характеристики устройства для просмотра. Например, в меню на вкладке Многопутевые устройства можно дополнительно показать , , , , .
Each device is presented on a separate row, with a checkbox to its left. Click the checkbox to make a device available during the installation process, or click the radio button at the left of the column headings to select or deselect all the devices listed in a particular screen. Later in the installation process, you can choose to install Fedora onto any of the devices selected here, and can choose to automatically mount any of the other devices selected here as part of the installed system.
Обратите внимание, что выбранные здесь устройства не будут очищены автоматически. Сам по себе выбор устройства на этом экране не подвергает его данные риску. Также стоит заметить, что даже если устройства не выбраны на этом этапе, их можно будет добавить в систему после установки, отредактировав файл /etc/fstab.
Any storage devices that you do not select on this screen are hidden from anaconda entirely. To chain load the Fedora boot loader from a different boot loader, select all the devices presented in this screen.
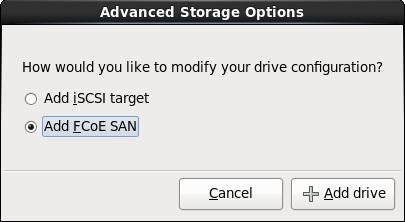
9.11.1.1. Advanced Storage Options
From this screen you can configure an
iSCSI (SCSI over TCP/IP) target or
FCoE (Fibre channel over ethernet)
SAN (storage area network). Refer to
Приложение B, ISCSI disks for an introduction to iSCSI.
9.11.1.1.1. Select and configure a network interface
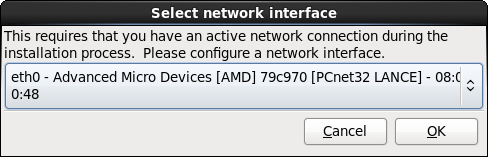
If a network interface is not already active on the system, anaconda must activate one through which to connect to the storage devices. If your system has only a single network interface, anaconda automatically activates it. However, if your system has more than one network interface available, anaconda prompts you with the Select network interface dialog to choose one to use during installation.
Select an interface from the drop-down menu.
Click OK.
Anaconda activates the interface that you selected, then starts NetworkManager to allow you to configure the interface.
9.11.1.1.2. Configure iSCSI parameters
To use iSCSI storage devices for the installation, anaconda must be able to discover them as iSCSI targets and be able to create an iSCSI session to access them. Each of these steps might require a username and password for CHAP (Challenge Handshake Authentication Protocol) authentication. Additionally, you can configure an iSCSI target to authenticate the iSCSI initiator on the system to which the target is attached (reverse CHAP), both for discovery and for the session. Used together, CHAP and reverse CHAP are called mutual CHAP or two-way CHAP. Mutual CHAP provides the greatest level of security for iSCSI connections, particularly if the username and password are different for CHAP authentication and reverse CHAP authentication.
Repeat the iSCSI discovery and iSCSI login steps as many times as necessary to add all required iSCSI storage. However, you cannot change the name of the iSCSI initiator after you attempt discovery for the first time. To change the iSCSI initiator name, you must restart the installation.
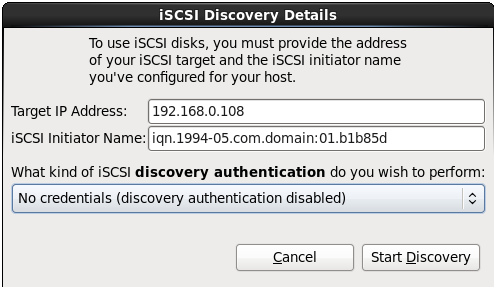
Процедура 9.1. iSCSI discovery
Use the iSCSI Discovery Details dialog to provide anaconda with the information that it needs to discover the iSCSI target.
Enter the IP address of the iSCSI target in the Target IP Address field.
Provide a name in the iSCSI Initiator Name field for the iSCSI initiator in iSCSI qualified name (IQN) format.
A valid IQN contains:
the string iqn. (note the period)
a date code that specifies the year and month in which your organization's Internet domain or subdomain name was registered, represented as four digits for the year, a dash, and two digits for the month, followed by a period. For example, represent September 2010 as 2010-09.
your organization's Internet domain or subdomain name, presented in reverse order with the top-level domain first. For example, represent the subdomain storage.example.com as com.example.storage
a colon followed by a string that uniquely identifies this particular iSCSI initiator within your domain or subdomain. For example, :diskarrays-sn-a8675309.
A complete IQN therefore resembles: iqn.2010-09.storage.example.com:diskarrays-sn-a8675309, and anaconda pre-populates the iSCSI Initiator Name field with a name in this format to help you with the structure.
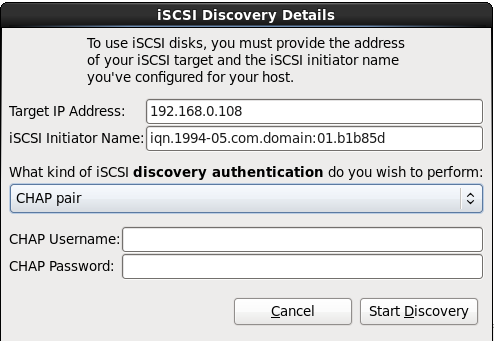
Use the drop-down menu to specify the type of authentication to use for iSCSI discovery:
If you selected as the authentication type, provide the username and password for the iSCSI target in the CHAP Username and CHAP Password fields.
If you selected as the authentication type, provide the username and password for the iSCSI target in the CHAP Username and CHAP Password field and the username and password for the iSCSI initiator in the Reverse CHAP Username and Reverse CHAP Password fields.
Click Start Discovery. Anaconda attempts to discover an iSCSI target based on the information that you provided. If discovery succeeds, the iSCSI Discovered Nodes dialog presents you with a list of all the iSCSI nodes discovered on the target.
Each node is presented with a checkbox beside it. Click the checkboxes to select the nodes to use for installation.
Click Login to initiate an iSCSI session.
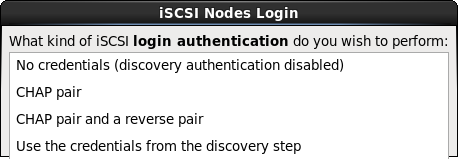
Процедура 9.2. Starting an iSCSI session
Use the iSCSI Nodes Login dialog to provide anaconda with the information that it needs to log into the nodes on the iSCSI target and start an iSCSI session.
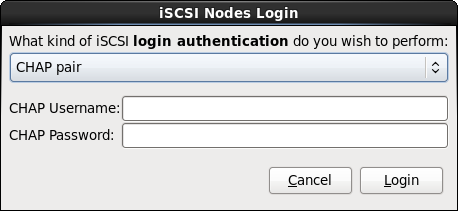
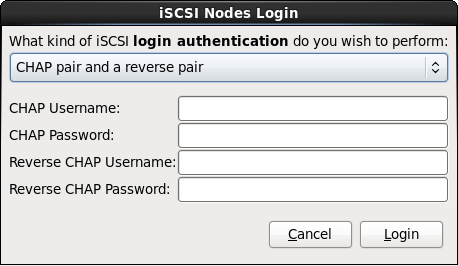
Use the drop-down menu to specify the type of authentication to use for the iSCSI session:
If your environment uses the same type of authentication and same username and password for iSCSI discovery and for the iSCSI session, select to reuse these credentials.
If you selected as the authentication type, provide the username and password for the iSCSI target in the CHAP Username and CHAP Password fields.
If you selected as the authentication type, provide the username and password for the iSCSI target in the CHAP Username and CHAP Password fields and the username and password for the iSCSI initiator in the Reverse CHAP Username and Reverse CHAP Password fields.
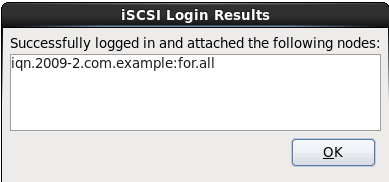
Click Login. Anaconda attempts to log into the nodes on the iSCSI target based on the information that you provided. The iSCSI Login Results dialog presents you with the results.
Click OK to continue.
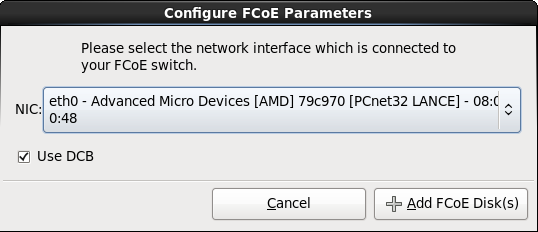
9.11.1.1.3. Configure FCoE Parameters
To configure an FCoE SAN, select Add FCoE SAN and click Add Drive.
On the menu that appears in the next dialog box, select the network interface that is connected to your FCoE switch and click Add FCoE Disk(s).
Data Center Bridging (DCB) is a set of enhancements to the Ethernet protocols designed to increase the efficiency of Ethernet connections in storage networks and clusters. Enable or disable the installer's awareness of DCB with the checkbox in this dialog.
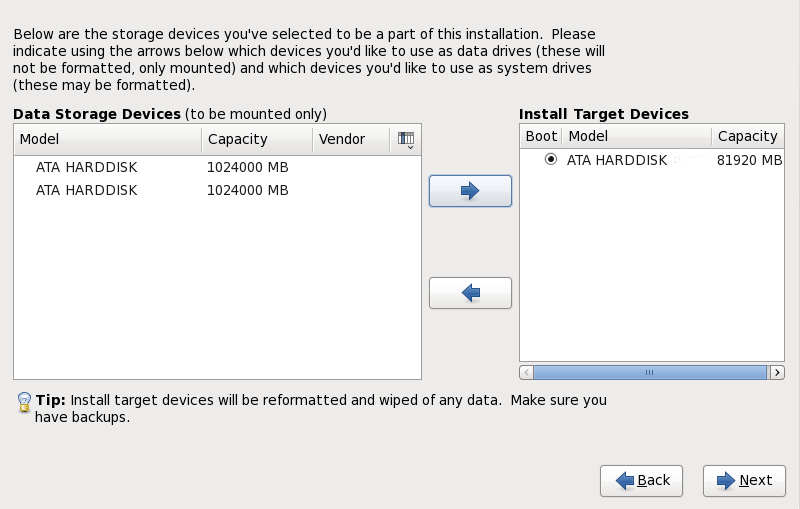
9.12. Assign Storage Devices
If you selected more than one storage device on the storage devices selection screen (refer to
Раздел 9.11, «Устройства хранения»),
anaconda asks you to select which of these devices should be available for installation of the operating system, and which should only be attached to the file system for data storage. If you selected only one storage device,
anaconda does not present you with this screen.
В процессе установки диски, выбранные на данном этапе в качестве устройств хранения, будут смонтированы без форматирования и создания разделов.
The screen is split into two panes. The left pane contains a list of devices to be used for data storage only. The right pane contains a list of devices that are to be available for installation of the operating system.
Each list contains information about the devices to help you to identify them. A small drop-down menu marked with an icon is located to the right of the column headings. This menu allows you to select the types of data presented on each device. Reducing or expanding the amount of information presented might help you to identify particular devices.
Move a device from one list to the other by clicking on the device, then clicking either the button labeled with a left-pointing arrow to move it to the list of data storage devices or the button labeled with a right-pointing arrow to move it to the list of devices available for installation of the operating system.
The list of devices available as installation targets also includes a radio button beside each device. Use this radio button to specify the device that you want to use as the boot device for the system.
If any storage device contains a boot loader that will chain load the Fedora boot loader, include that storage device among the Install Target Devices. Storage devices that you identify as Install Target Devices remain visible to anaconda during boot loader configuration.
Storage devices that you identify as
Install Target Devices on this screen are not automatically erased by the installation process unless you selected the
Use All Space option on the partitioning screen (refer to
Раздел 9.15, «Disk Partitioning Setup»).
When you have finished identifying devices to be used for installation, click Next to continue.
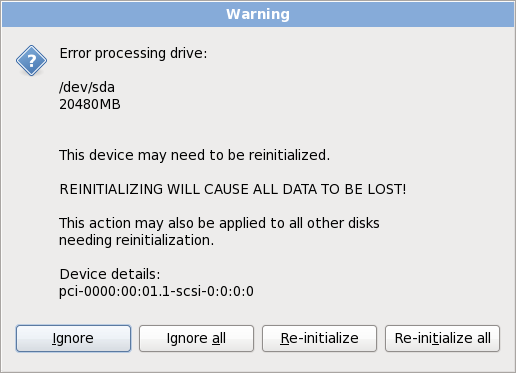
9.13. Initializing the Hard Disk
If no readable partition tables are found on existing hard disks, the installation program asks to initialize the hard disk. This operation makes any existing data on the hard disk unreadable. If your system has a brand new hard disk with no operating system installed, or you have removed all partitions on the hard disk, click Re-initialize drive.
The installation program presents you with a separate dialog for each disk on which it cannot read a valid partition table. Click the Ignore all button or Re-initialize all button to apply the same answer to all devices.
Certain RAID systems or other nonstandard configurations may be unreadable to the installation program and the prompt to initialize the hard disk may appear. The installation program responds to the physical disk structures it is able to detect.
To enable automatic initializing of hard disks for which it turns out to be necessary, use the kickstart command
clearpart --initlabel (refer to
Глава 15, Kickstart Installations)
If you have a nonstandard disk configuration that can be detached during installation and detected and configured afterward, power off the system, detach it, and restart the installation.
9.14. Upgrading an Existing System
Fedora предоставляет утилиту командной строки preupgrade, позволяющую выполнить обновление существующей установки Fedora до новой версии.
The installation system automatically detects any existing installation of Fedora. The upgrade process updates the existing system software with new versions, but does not remove any data from users' home directories. The existing partition structure on your hard drives does not change. Your system configuration changes only if a package upgrade demands it. Most package upgrades do not change system configuration, but rather install an additional configuration file for you to examine later.
Обратите внимание, что установочный носитель может не содержать все пакеты для обновления.
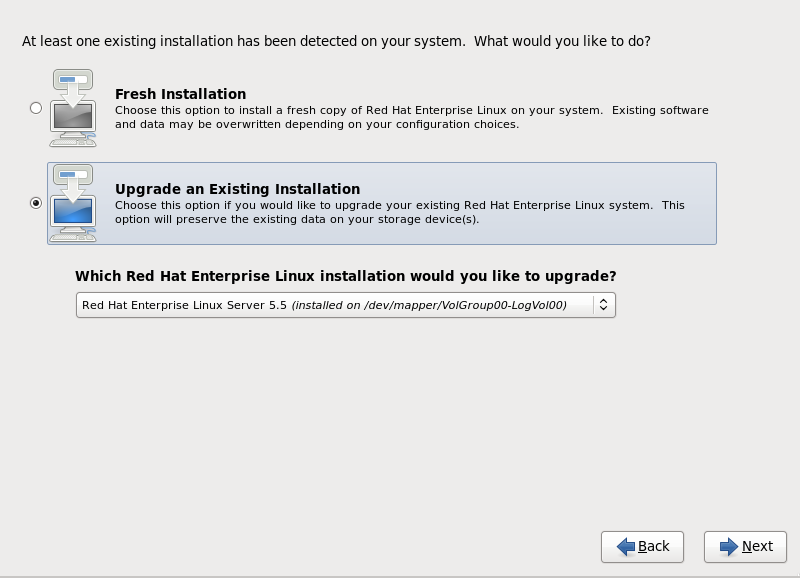
9.14.1. Экран обновления системы
If your system contains a Fedora installation, a dialog appears asking whether you want to upgrade that installation. To perform an upgrade of an existing system, choose the appropriate installation from the drop-down list and select Next.
Software you have installed manually on your existing Fedora system may behave differently after an upgrade. You may need to manually reinstall or recompile this software after an upgrade to ensure it performs correctly on the updated system.
If you are re-installing the same version of Fedora, preserve your user data by placing it on a separate /home partition.
9.14.2. Upgrading Using the Installer
In general, the Fedora Project recommends that you keep user data on a separate
/home partition and perform a fresh installation. For more information on partitions and how to set them up, refer to
Раздел 9.15, «Disk Partitioning Setup».
If you choose to upgrade your system using the installation program, any software not provided by Fedora that conflicts with Fedora software is overwritten. Before you begin an upgrade this way, make a list of your system's current packages for later reference:
rpm -qa --qf '%{NAME} %{VERSION}-%{RELEASE} %{ARCH}\n' > ~/old-pkglist.txt
After installation, consult this list to discover which packages you may need to rebuild or retrieve from sources other than the Fedora Project.
Next, make a backup of any system configuration data:
su -c 'tar czf /tmp/etc-`date +%F`.tar.gz /etc'
su -c 'mv /tmp/etc-*.tar.gz /home'
Make a complete backup of any important data before performing an upgrade. Important data may include the contents of your entire /home directory as well as content from services such as an Apache, FTP, or SQL server, or a source code management system. Although upgrades are not destructive, if you perform one improperly there is a small possibility of data loss.
Note that the above examples store backup materials in a /home directory. If your /home directory is not a separate partition, you should not follow these examples verbatim! Store your backups on another device such as CD or DVD discs or an external hard disk.
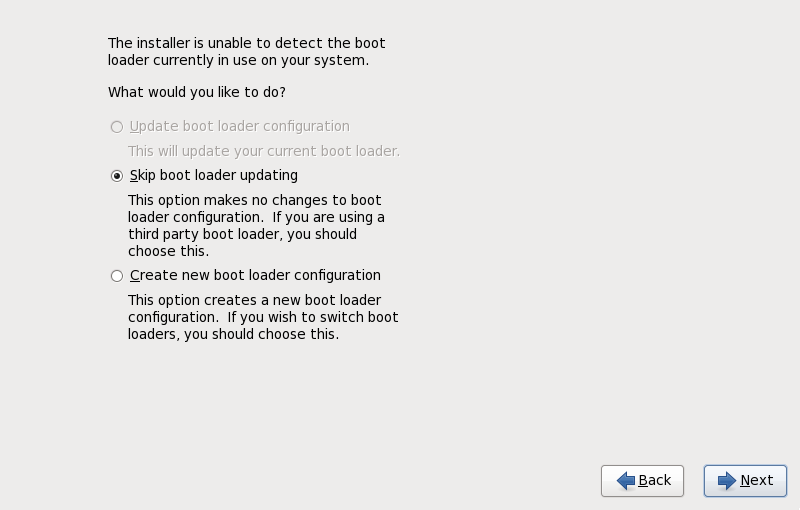
9.14.3. Upgrading Boot Loader Configuration
Your completed Fedora installation must be registered in the
boot loader to boot properly. A boot loader is software on your machine that locates and starts the operating system. Refer to
Приложение E, The GRUB Boot Loader for more information about boot loaders.
If the existing boot loader was installed by a Linux distribution, the installation system can modify it to load the new Fedora system. To update the existing Linux boot loader, select Update boot loader configuration. This is the default behavior when you upgrade an existing Fedora installation.
GRUB is the standard boot loader for Fedora on 32-bit and 64-bit x86 architectures. If your machine uses another boot loader, such as BootMagic, System Commander, or the loader installed by Microsoft Windows, then the Fedora installation system cannot update it. In this case, select Skip boot loader updating. When the installation process completes, refer to the documentation for your product for assistance.
Install a new boot loader as part of an upgrade process only if you are certain you want to replace the existing boot loader. If you install a new boot loader, you may not be able to boot other operating systems on the same machine until you have configured the new boot loader. Select Create new boot loader configuration to remove the existing boot loader and install GRUB.
9.15. Disk Partitioning Setup
It is always a good idea to back up any data that you have on your systems. For example, if you are upgrading or creating a dual-boot system, you should back up any data you wish to keep on your storage devices. Mistakes do happen and can result in the loss of all your data.
If you install Fedora in text mode, you can only use the default partitioning schemes described in this section. You cannot add or remove partitions or file systems beyond those that the installer automatically adds or removes. If you require a customized layout at installation time, you should perform a graphical installation over a VNC connection or a kickstart installation.
Furthermore, advanced options such as LVM, encrypted filesystems, and resizable filesystems are available only in graphical mode and kickstart.
If you have a RAID card, be aware that some BIOSes do not support booting from the RAID card. In cases such as these, the /boot/ partition must be created on a partition outside of the RAID array, such as on a separate hard drive. An internal hard drive is necessary to use for partition creation with problematic RAID cards.
A /boot/ partition is also necessary for software RAID setups.
If you have chosen to automatically partition your system, you should select Review and manually edit your /boot/ partition.
Partitioning allows you to divide your hard drive into isolated sections, where each section behaves as its own hard drive. Partitioning is particularly useful if you run multiple operating systems. If you are not sure how you want your system to be partitioned, read
Приложение A, An Introduction to Disk Partitions for more information.
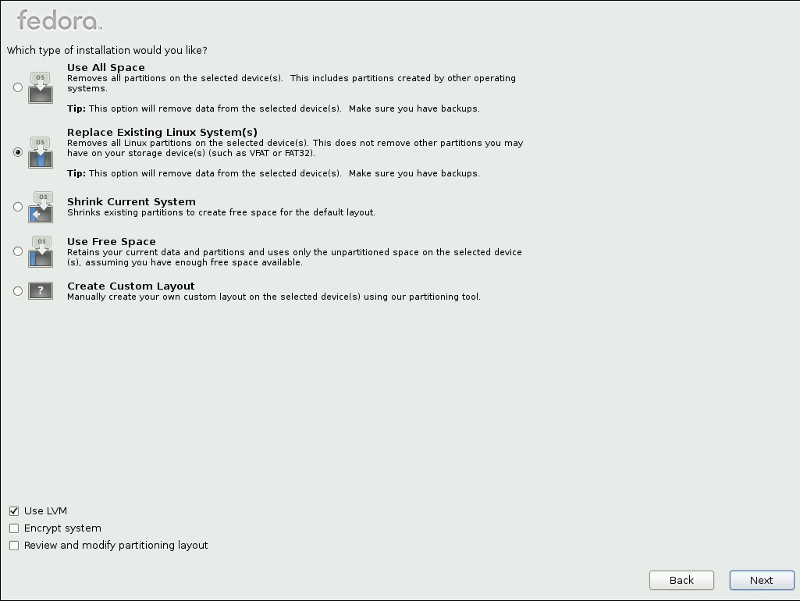
On this screen you can choose to create the default partition layout in one of four different ways, or choose to partition storage devices manually to create a custom layout.
The first four options allow you to perform an automated installation without having to partition your storage devices yourself. If you do not feel comfortable with partitioning your system, choose one of these options and let the installation program partition the storage devices for you. Depending on the option that you choose, you can still control what data (if any) is removed from the system.
Your options are:
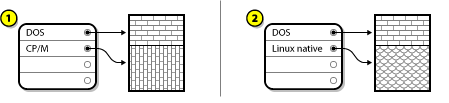
- Use All Space
Select this option to remove all partitions on your hard drives (this includes partitions created by other operating systems such as Windows VFAT or NTFS partitions).
If you select this option, all data on the selected hard drives is removed by the installation program. Do not select this option if you have information that you want to keep on the hard drives where you are installing Fedora.
In particular, do not select this option when you configure a system to chain load the Fedora boot loader from another boot loader.
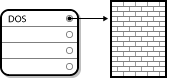
- Replace Existing Linux System(s)
Select this option to remove only partitions created by a previous Linux installation. This does not remove other partitions you may have on your hard drives (such as VFAT or FAT32 partitions).
- Shrink Current System
Select this option to resize your current data and partitions manually and install a default Fedora layout in the space that is freed.
If you shrink partitions on which other operating systems are installed, you might not be able to use those operating systems. Although this partitioning option does not destroy data, operating systems typically require some free space in their partitions. Before you resize a partition that holds an operating system that you might want to use again, find out how much space you need to leave free.
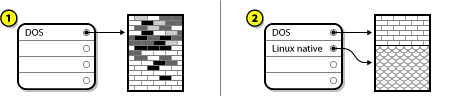
- Use Free Space
Select this option to retain your current data and partitions and install Fedora in the unused space available on the storage drives. Ensure that there is sufficient space available on the storage drives before you select this option — refer to
Раздел 4.4, «Достаточно ли дискового пространства?».
If your 64-bit x86 system uses UEFI instead of BIOS, you will need to manually create a /boot partition. This partition must have an ext3 file system. If you choose to partition automatically, your system will not boot.
- Create Custom Layout
Choose your preferred partitioning method by clicking the radio button to the left of its description in the dialog box.
Select
Encrypt system to encrypt all partitions except the
/boot partition. Refer to
Приложение C, Disk Encryption for information on encryption.
To review and make any necessary changes to the partitions created by automatic partitioning, select the Review option. After selecting Review and clicking Next to move forward, the partitions created for you by anaconda appear. You can make modifications to these partitions if they do not meet your needs.
To configure the Fedora boot loader to chain load from a different boot loader, you must specify the boot drive manually. If you chose any of the automatic partitioning options, you must now select the Review and modify partitioning layout option before you click Next or you cannot specify the correct boot drive.
When you install Fedora on a system with multipath and non-multipath storage devices, the automatic partitioning layout in the installer might create volume groups that contain a mix of multipath and non-multipath devices. This defeats the purpose of multipath storage.
We advise that you select only multipath or only non-multipath devices on the disk selection screen that appears after selecting automatic partitioning. Alternatively, select custom partitioning.
Сделав выбор, нажмите Далее для продолжения установки.
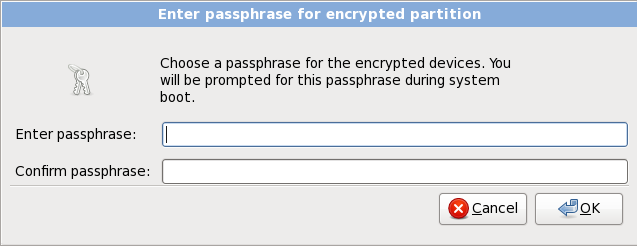
If you selected the Encrypt System option, the installer prompts you for a passphrase with which to encrypt the partitions on the system.
Choose a passphrase and type it into each of the two fields in the dialog box. You must provide this passphrase every time that the system boots.
If you lose this passphrase, any encrypted partitions and the data on them will become completely inaccessible. There is no way to recover a lost passphrase.
9.17. Creating a Custom Layout or Modifying the Default Layout
If you chose one of the automatic partitioning options and selected Review, you can either accept the current partition settings (click Next), or modify the setup manually in the partitioning screen.
If you chose to create a custom layout, you must tell the installation program where to install Fedora. This is done by defining mount points for one or more disk partitions in which Fedora is installed. You may also need to create and/or delete partitions at this time.
Anaconda can handle the partitioning requirements for a typical installation.
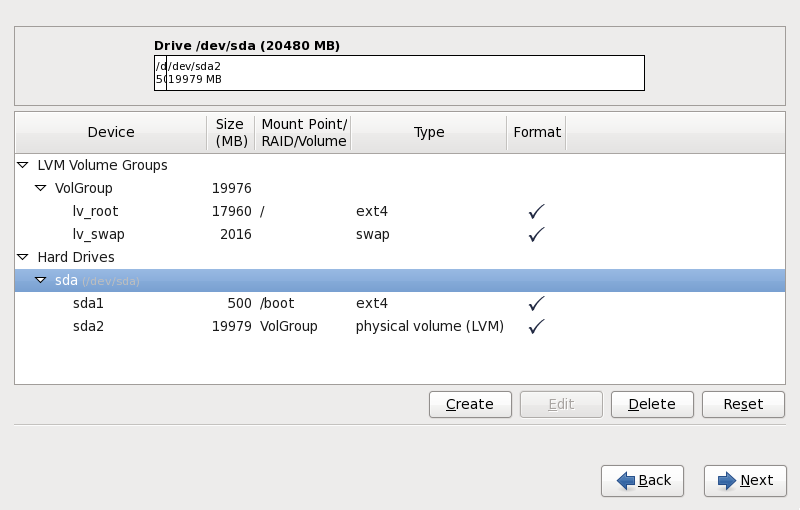
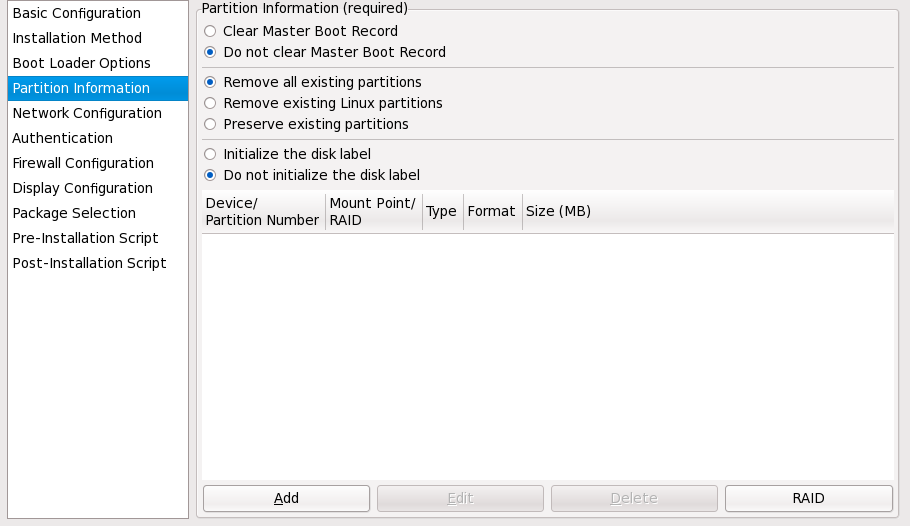
Рисунок 9.44. Partitioning on x86, AMD64, and Intel 64 Systems
The partitioning screen contains two panes. The top pane contains a graphical representation of the hard drive, logical volume, or RAID device selected in the lower pane.
Above the graphical representation of the device, you can review the name of the drive (such as /dev/sda or LogVol00), its size (in MB), and its model as detected by the installation program.
Using your mouse, click once to highlight a particular field in the graphical display. Double-click to edit an existing partition or to create a partition out of existing free space.
The lower pane contains a list of all drives, logical volumes, and RAID devices to be used during installation, as specified earlier in the installation process — refer to
Раздел 9.12, « Assign Storage Devices »
Devices are grouped by type. Click on the small triangles to the left of each device type to view or hide devices of that type.
Anaconda displays several details for each device listed:
- Device
the name of the device, logical volume, or partition
- Size (MB)
the size of the device, logical volume, or partition (in MB)
- Mount Point/RAID/Volume
the mount point (location within a file system) on which a partition is to be mounted, or the name of the RAID or logical volume group of which it is a part
- Type
the type of partition. If the partition is a standard partition, this field displays the type of file system on the partition (for example, ext4). Otherwise, it indicates that the partition is a physical volume (LVM), or part of a software RAID
- Format
A check mark in this column indicates that the partition will be formatted during installation.
Beneath the lower pane are four buttons: Create, Edit, Delete, and Reset.
Select a device or partition by clicking on it in either the graphical representation in the upper pane of in the list in the lower pane, then click one of the four buttons to carry out the following actions:
- Create
create a new partition, logical volume, or software RAID
- Edit
change an existing partition, logical volume, or software RAID. Note that you can only shrink partitions with the Resize button, not enlarge partitions.
- Delete
remove a partition, logical volume, or software RAID
- Reset
undo all changes made in this screen
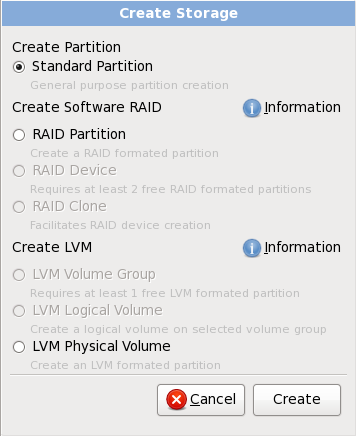
The Create Storage dialog allows you to create new storage partitions, logical volumes, and software RAIDs. Anaconda presents options as available or unavailable depending on the storage already present on the system or configured to transfer to the system.
Options are grouped under Create Partition, Create Software RAID and Create LVM as follows:
Create Software RAID
RAID Partition — create a partition in unallocated space to form part of a software RAID device. To form a software RAID device, two or more RAID partitions must be available on the system.
RAID Device — combine two or more RAID partitions into a software RAID device. When you choose this option, you can specify the type of RAID device to create (the RAID level). This option is only available when two or more RAID partitions are available on the system.
Create LVM Logical Volume
LVM Physical Volume — create a physical volume in unallocated space.
LVM Volume Group — create a volume group from one or more physical volumes. This option is only available when at least one physical volume is available on the system.
LVM Logical Volume — create a logical volume on a volume group. This option is only available when at least one volume group is available on the system.
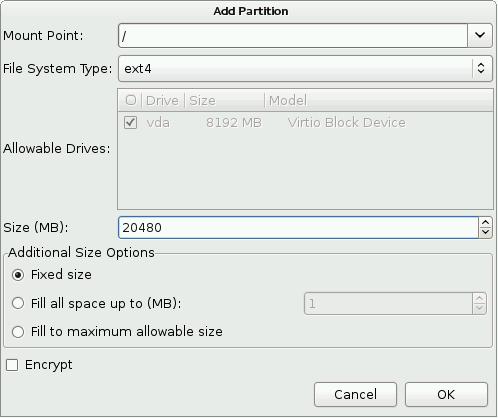
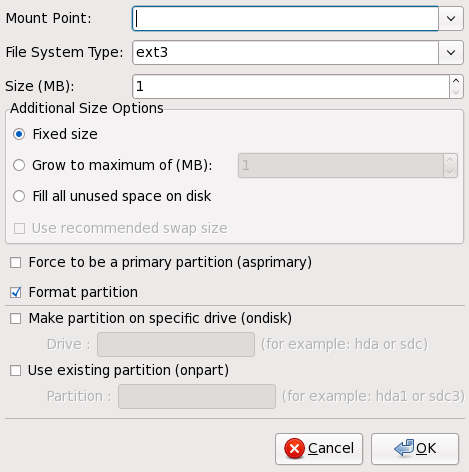
9.17.2. Adding Partitions
Mount Point: Enter the partition's mount point. For example, if this partition should be the root partition, enter /; enter /boot for the /boot partition, and so on. You can also use the pull-down menu to choose the correct mount point for your partition. For a swap partition the mount point should not be set — setting the filesystem type to swap is sufficient.
File System Type: Using the pull-down menu, select the appropriate file system type for this partition. For more information on file system types, refer to
Раздел 9.17.2.1, «File System Types».
Доступные устройства: В этом поле содержится список жестких дисков, установленных в вашей системе. Если жесткий диск выделен, значит требуемый раздел может быть создан на этом диске. Если диск не выделен, раздел на этом диске не может быть создан. С помощью различных настроек можно добиться того, чтобы anaconda разместила разделы там, где вам нужно, или позволить anaconda решать, где должны быть разделы.
Size (MB): Enter the size (in megabytes) of the partition. Note, this field starts with 200 MB; unless changed, only a 200 MB partition will be created.
Дополнительные опции размера: Определите, будет ли этот раздел иметь фиксированный размер, или вы позволите ему "вырасти" (заполнить все свободное дисковое пространство) до определенного размера, или же занять без ограничений все доступное на диске пространство.
If you choose Fill all space up to (MB), you must give size constraints in the field to the right of this option. This allows you to keep a certain amount of space free on your hard drive for future use.
Шифрование: позволяет зашифровать раздел. Тогда доступ к данным в этом разделе можно будет получить только при наличии парольной фразы. При выборе этой опции программа установки запросит ввод парольной фразы.
Приложение C, Disk Encryption содержит подробную информацию о шифровании устройств хранения.
OK: Select OK once you are satisfied with the settings and wish to create the partition.
Cancel: Select Cancel if you do not want to create the partition.
9.17.2.1. File System Types
Fedora allows you to create different partition types and file systems. The following is a brief description of the different partition types and file systems available, and how they can be used.
Типы разделов
стандартный раздел может содержать файловую систему, пространство подкачки или может служить в качестве основы для создания программного RAID-массива или физического тома LVM.
swap — Swap partitions are used to support virtual memory. In other words, data is written to a swap partition when there is not enough RAM to store the data your system is processing. Refer to the Fedora Deployment Guide for additional information.
software RAID — Creating two or more software RAID partitions allows you to create a RAID device. For more information regarding RAID, refer to the chapter RAID (Redundant Array of Independent Disks) in the Fedora Deployment Guide.
physical volume (LVM) — Creating one or more physical volume (LVM) partitions allows you to create an LVM logical volume. LVM can improve performance when using physical disks. For more information regarding LVM, refer to the Fedora Deployment Guide.
File systems
ext4 — The ext4 file system is based on the ext3 file system and features a number of improvements. These include support for larger file systems and larger files, faster and more efficient allocation of disk space, no limit on the number of subdirectories within a directory, faster file system checking, and more robust journaling. The ext4 file system is selected by default and is highly recommended.
ext3 — The ext3 file system is based on the ext2 file system and has one main advantage — journaling. Using a journaling file system reduces time spent recovering a file system after a crash as there is no need to fsck [] the file system.
ext2 — An ext2 file system supports standard Unix file types (regular files, directories, symbolic links, etc). It provides the ability to assign long file names, up to 255 characters.
xfs — XFS is a highly scalable, high-performance file system that supports filesystems up to 16 exabytes (approximately 16 million terabytes), files up to 8 exabytes (approximately 8 million terabytes) and directory structures containing tens of millions of entries. XFS supports metadata journaling, which facilitates quicker crash recovery. The XFS file system can also be defragmented and resized while mounted and active.
vfat — файловая система Linux, совместимая с FAT и поддерживающая длинные имена файлов Microsoft Windows.
The Btrfs file system is unavailable in Fedora 17.
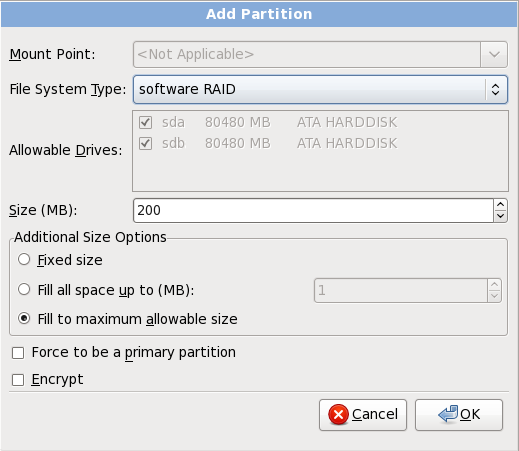
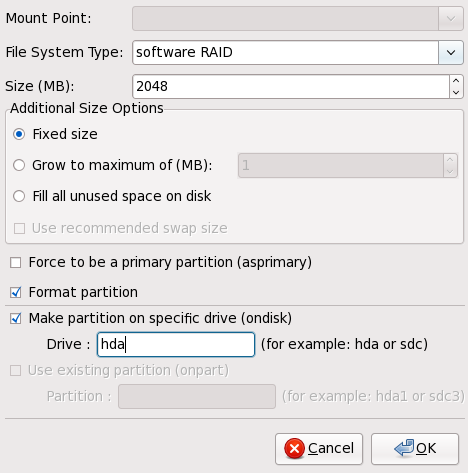
9.17.3. Create Software RAID
Redundant arrays of independent disks (RAIDs) are constructed from multiple storage devices that are arranged to provide increased performance and — in some configurations — greater fault tolerance. Refer to the Fedora Deployment Guide for a description of different kinds of RAIDs.
To make a RAID device, you must first create software RAID partitions. Once you have created two or more software RAID partitions, select RAID to join the software RAID partitions into a RAID device.
- RAID Partition
Choose this option to configure a partition for software RAID. This option is the only choice available if your disk contains no software RAID partitions. This is the same dialog that appears when you add a standard partition — refer to
Раздел 9.17.2, «Adding Partitions» for a description of the available options. Note, however, that
File System Type must be set to
software RAID
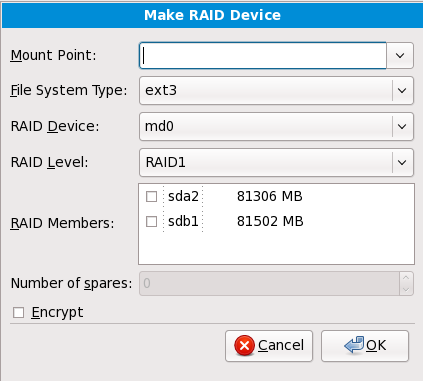
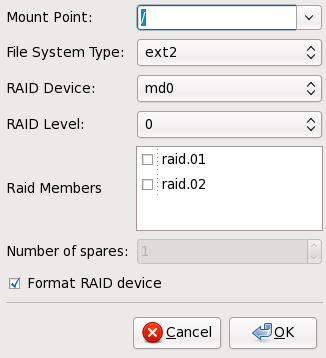
- RAID Device
Choose this option to construct a RAID device from two or more existing software RAID partitions. This option is available if two or more software RAID partitions have been configured.
Select the file system type as for a standard partition.
Anaconda automatically suggests a name for the RAID device, but you can manually select names from md0 to md15.
Click the checkboxes beside individual storage devices to include or remove them from this RAID.
The RAID Level corresponds to a particular type of RAID. Choose from the following options:
RAID 0 — distributes data across multiple storage devices. Level 0 RAIDs offer increased performance over standard partitions, and can be used to pool the storage of multiple devices into one large virtual device. Note that Level 0 RAIDS offer no redundancy and that the failure of one device in the array destroys the entire array. RAID 0 requires at least two RAID partitions.
RAID 1 — mirrors the data on one storage device onto one or more other storage devices. Additional devices in the array provide increasing levels of redundancy. RAID 1 requires at least two RAID partitions.
RAID 4 — distributes data across multiple storage devices, but uses one device in the array to store parity information that safeguards the array in case any device within the array fails. Because all parity information is stored on the one device, access to this device creates a bottleneck in the performance of the array. RAID 4 requires at least three RAID partitions.
RAID 5 — distributes data and parity information across multiple storage devices. Level 5 RAIDs therefore offer the performance advantages of distributing data across multiple devices, but do not share the performance bottleneck of level 4 RAIDs because the parity information is also distributed through the array. RAID 5 requires at least three RAID partitions.
RAID 6 — level 6 RAIDs are similar to level 5 RAIDs, but instead of storing only one set of parity data, they store two sets. RAID 6 requires at least four RAID partitions.
RAID 10 — level 10 RAIDs are nested RAIDs or hybrid RAIDs. Level 10 RAIDs are constructed by distributing data over mirrored sets of storage devices. For example, a level 10 RAID constructed from four RAID partitions consists of two pairs of partitions in which one partition mirrors the other. Data is then distributed across both pairs of storage devices, as in a level 0 RAID. RAID 10 requires at least four RAID partitions.
9.17.4. Create LVM Logical Volume
LVM initial set up is not available during text-mode installation. If you need to create an LVM configuration from scratch, press Alt+F2 to use a different virtual console, and run the lvm command. To return to the text-mode installation, press Alt+F1.
Logical Volume Management (LVM) presents a simple logical view of underlying physical storage space, such as a hard drives or LUNs. Partitions on physical storage are represented as physical volumes that can be grouped together into volume groups. Each volume group can be divided into multiple logical volumes, each of which is analogous to a standard disk partition. Therefore, LVM logical volumes function as partitions that can span multiple physical disks.
To read more about LVM, refer to the Fedora Deployment Guide. Note, LVM is only available in the graphical installation program.
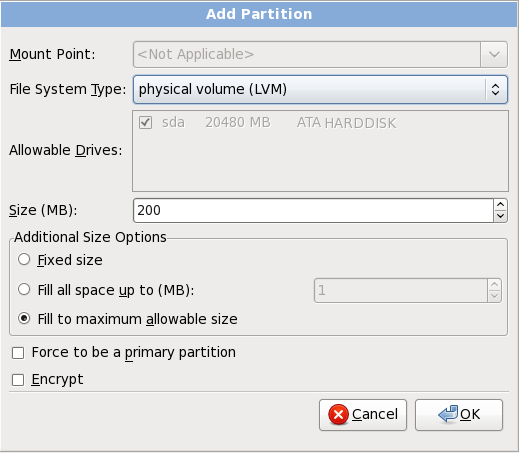
- LVM Physical Volume
Choose this option to configure a partition or device as an LVM physical volume. This option is the only choice available if your storage does not already contain LVM Volume Groups. This is the same dialog that appears when you add a standard partition — refer to
Раздел 9.17.2, «Adding Partitions» for a description of the available options. Note, however, that
File System Type must be set to
physical volume (LVM)
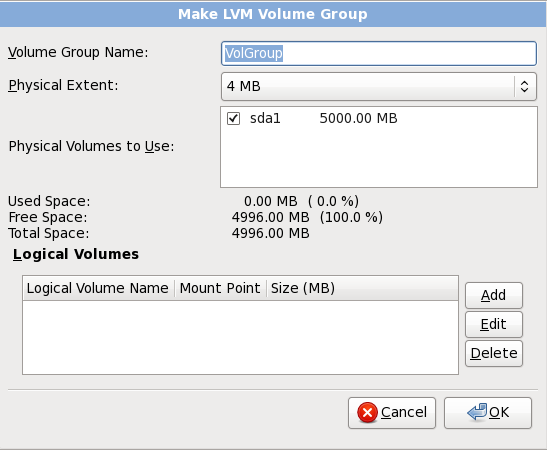
- Make LVM Volume Group
Choose this option to create LVM volume groups from the available LVM physical volumes, or to add existing logical volumes to a volume group.
To assign one or more physical volumes to a volume group, first name the volume group. Then select the physical volumes to be used in the volume group. Finally, configure logical volumes on any volume groups using the Add, Edit and Delete options.
You may not remove a physical volume from a volume group if doing so would leave insufficient space for that group's logical volumes. Take for example a volume group made up of two 5 GB LVM physical volume partitions, which contains an 8 GB logical volume. The installer would not allow you to remove either of the component physical volumes, since that would leave only 5 GB in the group for an 8 GB logical volume. If you reduce the total size of any logical volumes appropriately, you may then remove a physical volume from the volume group. In the example, reducing the size of the logical volume to 4 GB would allow you to remove one of the 5 GB physical volumes.
- Make Logical Volume
Choose this option to create an LVM logical volume. Select a mount point, file system type, and size (in MB) just as if it were a standard disk partition. You can also choose a name for the logical volume and specify the volume group to which it will belong.
9.17.5. Recommended Partitioning Scheme
9.17.5.1. x86, AMD64, and Intel 64 systems
Unless you have a reason for doing otherwise, we recommend that you create the following partitions for x86, AMD64, and Intel 64 systems:
A swap partition
A /boot partition
A / partition
A /home partition
Раздел подкачки (swap) (по меньшей мере 256 МБ) используется для поддержки виртуальной памяти. Данные попадают в раздел подкачки, когда вашей системе не хватает оперативной памяти для обработки данных.
In years past, the recommended amount of swap space increased linearly with the amount of RAM in the system. But because the amount of memory in modern systems has increased into the hundreds of gigabytes, it is now recognized that the amount of swap space that a system needs is a function of the memory workload running on that system.
Swap space is usually designated during installation, but determining the memory workload of a system at this point can be difficult. During a kickstart installation, you can request that the amount of swap space be set automatically (refer to
Раздел 15.4, «Kickstart Options».
However, this setting is not precisely calibrated for your system, so use the following table if you require the amount of swap space to be set more precisely.
Таблица 9.2. Рекомендуемый размер пространства подкачки
|
Объем ОЗУ
|
Рекомендуемый объем пространства подкачки
|
|---|
|
до 4 ГБ ОЗУ
|
минимум 2 ГБ для пространства подкачки
|
|
от 4 до 16 ГБ ОЗУ
|
минимум 4 ГБ для пространства подкачки
|
|
от 16 до 64 ГБ ОЗУ
|
минимум 8 ГБ для пространства подкачки
|
|
от 64 до 256 ГБ ОЗУ
|
минимум 16 ГБ для пространства подкачки
|
|
от 256 до 512 ГБ ОЗУ
|
минимум 32 ГБ для пространства подкачки
|
Можно повысить производительность, распределив пространство подкачки между несколькими устройствами хранения. Разница будет особенно заметна в системах с быстрыми дисками, контроллерами и интерфейсами.
The partition mounted on /boot/ contains the operating system kernel (which allows your system to boot Fedora), along with files used during the bootstrap process. For most users, a 250 MB boot partition is sufficient.
The GRUB bootloader in Fedora 17 supports only the ext2, ext3, and ext4 (recommended) file systems. You cannot use any other file system for /boot, such as Btrfs, XFS, or VFAT.
If your hard drive is more than 1024 cylinders (and your system was manufactured more than two years ago), you may need to create a /boot/ partition if you want the / (root) partition to use all of the remaining space on your hard drive.
If you have a RAID card, be aware that some BIOSes do not support booting from the RAID card. In cases such as these, the /boot/ partition must be created on a partition outside of the RAID array, such as on a separate hard drive.
This is where "/" (the root directory) is located. In this setup, all files (except those stored in /boot) are on the root partition.
A 3.0 GB partition allows you to install a minimal installation, while a 5.0 GB root partition lets you perform a full installation, choosing all package groups.
The / (or root) partition is the top of the directory structure. The /root directory/root (sometimes pronounced "slash-root") directory is the home directory of the user account for system administration.
To store user data separately from system data, create a dedicated partition within a volume group for the /home directory. This will enable you to upgrade or reinstall Fedora without erasing user data files.
The following table summarizes minimum partition sizes for the partitions containing the listed directories. You do not have to make a separate partition for each of these directories. For instance, if the partition containing /foo must be at least 500 MB, and you do not make a separate /foo partition, then the / (root) partition must be at least 500 MB.
Таблица 9.3. Minimum partition sizes
|
Directory
|
Minimum size
|
|---|
/
|
250 MB
|
/usr
|
250 MB, but avoid placing this on a separate partition
|
/tmp
|
50 MB
|
/var
|
384 MB
|
/home
|
100 MB
|
/boot
|
250 MB
|
Only assign storage capacity to those partitions you require immediately. You may allocate free space at any time, to meet needs as they occur. To learn about a more flexible method for storage management, refer to
Приложение D, Understanding LVM.
If you are not sure how best to configure the partitions for your computer, accept the default partition layout.
9.17.5.1.1. Advice on Partitions
Optimal partition setup depends on the usage for the Linux system in question. The following tips may help you decide how to allocate your disk space.
Рассмотрите возможность шифрования разделов, содержащих важные данные, для их защиты от неавторизованного доступа. Как минимум рекомендуется зашифровать раздел /home.
Each kernel installed on your system requires approximately 10 MB on the /boot partition. Unless you plan to install a great many kernels, the default partition size of 250 MB for /boot should suffice.
The GRUB bootloader in Fedora 17 supports only the ext2, ext3, and ext4 (recommended) file systems. You cannot use any other file system for /boot, such as Btrfs, XFS, or VFAT.
The /var directory holds content for a number of applications, including the Apache web server. It also is used to store downloaded update packages on a temporary basis. Ensure that the partition containing the /var directory has enough space to download pending updates and hold your other content.
The PackageKit update software downloads updated packages to /var/cache/yum/ by default. If you partition the system manually, and create a separate /var/ partition, be sure to create the partition large enough (3.0 GB or more) to download package updates.
Каталог /usr содержит основную часть программного обеспечения Fedora. Для установки стандартного набора пакетов потребуется примерно 4 ГБ пространства. Программистам, планирующим использовать Fedora для разработки ПО, рекомендуется как минимум удвоить это число.
If /usr is on a separate file system from /, the boot process becomes much more complex because /usr contains boot-critical components. In some situations (like installations on iSCSI drives), the boot process might not work at all.
Consider leaving a portion of the space in an LVM volume group unallocated. This unallocated space gives you flexibility if your space requirements change but you do not wish to remove data from other partitions to reallocate storage.
Распределение подкаталогов между разными разделами позволит сохранить их содержимое в случае переустановки Fedora. Например, если база данных MySQL хранится в /var/lib/mysql, можно поместить этот каталог в отдельный раздел, тогда ее не надо будет восстанавливать при переустановке.
If you are creating a custom partition layout on a non-EFI x86 system, you are strongly advised to create a separate, 1MB BIOS boot partition. This is only recommended on the disk you are installing the bootloader on and if any of the following conditions apply:
The disk contains a GPT partition table.
The installer has already initialized the disk for you.
You selected Use All Space in the Disk Partitioning Setup.
This boot partition will be used by the GRUB boot loader for storage.
The following table is a possible partition setup for a system with a single, new 80 GB hard disk and 1 GB of RAM. Note that approximately 10 GB of the volume group is unallocated to allow for future growth.
This setup is not optimal for all use cases.
Пример 9.1. Example partition setup
Таблица 9.4. Example partition setup
|
Partition
|
Size and type
|
|---|
/boot
|
250 МБ, ext3
|
swap
|
2 GB swap
|
|
LVM physical volume
|
Remaining space, as one LVM volume group
|
The physical volume is assigned to the default volume group and divided into the following logical volumes:
Таблица 9.5. Example partition setup: LVM physical volume
|
Partition
|
Size and type
|
|---|
/
|
13 GB ext4
|
/var
|
4 GB ext4
|
/home
|
50 GB ext4
|
9.18. Write changes to disk
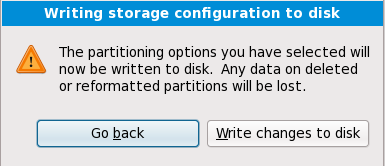
Программа установки попросит подтвердить выбранные настройки разбиения диска. Нажмите Сохранить изменения на диск для продолжения установки.
If you are certain that you want to proceed, click Write changes to disk.
До этого момента в процессе установки программа установки не сохраняла изменения на вашем компьютере. При нажатии кнопки Сохранить изменения на диск программа установки выделит место на жестком диске и начнет установку Fedora. В зависимости от выбранной схемы разбиения диска на разделы, этот процесс может включать удаление существующих данных.
To revise any of the choices that you made up to this point, click Go back. To cancel installation completely, switch off your computer. To switch off most computers at this stage, press the power button and hold it down for a few seconds.
После того, как вы нажали Записать изменения на диск, отменить установку будет невозможно. Если установка была прервана (например, компьютер был выключен), Вы не сможете использовать свой компьютер до тех пор, пока не перезапустите и не завершите процесс установки или пока не установите другую ОС.
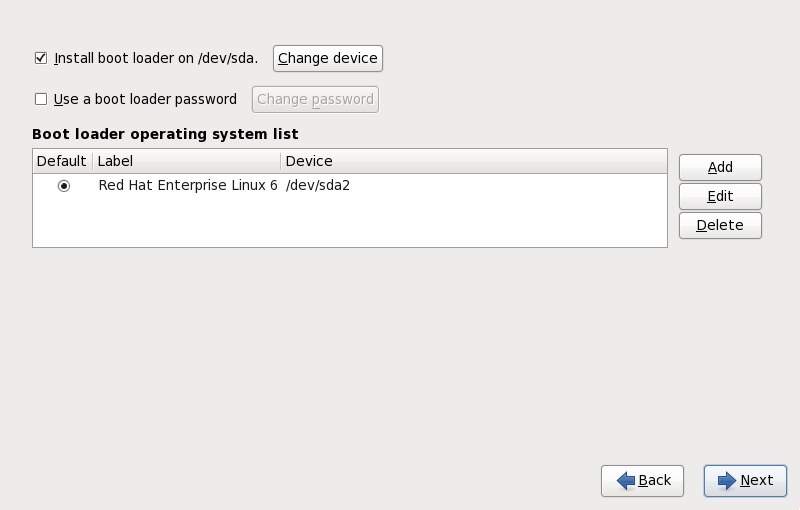
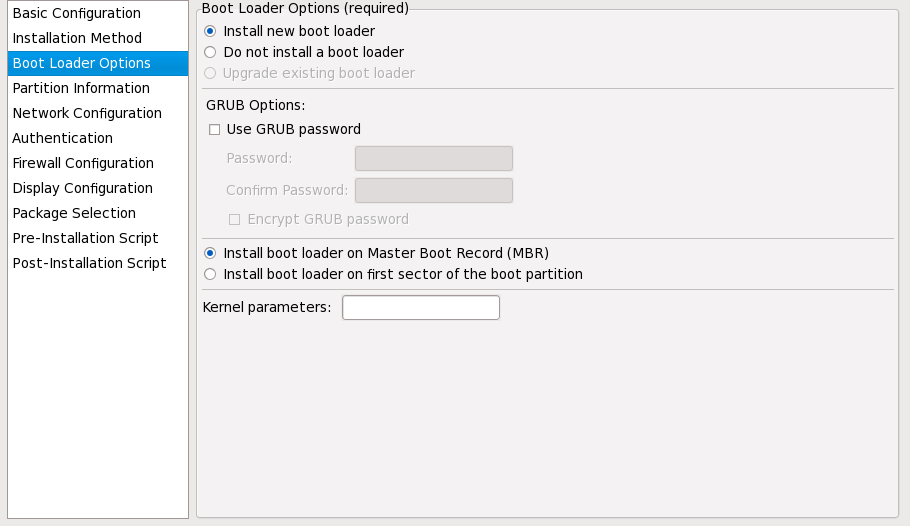
9.19. Настройка загрузчика на платформах x86, AMD64 и Intel 64
To boot the system without boot media, you usually need to install a boot loader. A boot loader is the first software program that runs when a computer starts. It is responsible for loading and transferring control to the operating system kernel software. The kernel, in turn, initializes the rest of the operating system.
При выполнении установки в текстовом режиме загрузчик будет настроен автоматически и в процессе установки его настройки нельзя будет изменить.
GRUB (GRand Unified Bootloader), which is installed by default, is a very powerful boot loader. GRUB can load a variety of free operating systems, as well as proprietary operating systems with chain-loading (the mechanism for loading unsupported operating systems, such as Windows, by loading another boot loader). Note that Fedora 17 uses GRUB 2. GRUB Legacy is no longer actively developed.[]
The GRUB menu defaults to being hidden, except on dual-boot systems. To show the GRUB menu during system boot, press and hold the Shift key before the kernel is loaded. (Any other key works as well but the Shift key is the safest to use.)
You may have a boot loader installed on your system already. An operating system may install its own preferred boot loader, or you may have installed a third-party boot loader. If your boot loader does not recognize Linux partitions, you may not be able to boot Fedora. Use GRUB as your boot loader to boot Linux and most other operating systems. Follow the directions in this chapter to install GRUB.
If you install GRUB, it may overwrite your existing boot loader.
By default, the installation program installs GRUB in the master boot record or
MBR, of the device for the root file system. To decline installation of a new boot loader, unselect
Install boot loader on /dev/sda.
If you choose not to install GRUB for any reason, you will not be able to boot the system directly, and you must use another boot method (such as a commercial boot loader application). Use this option only if you are sure you have another way of booting the system!
Если на компьютере установлены другие операционные системы, Fedora попытается автоматически определить их и настроить GRUB для их загрузки. Это можно сделать самостоятельно, если GRUB не обнаружил системы.
Для добавления, удаления или изменения обнаруженных операционных систем воспользуйтесь соответствующими опциями.
- Добавить
Выберите Добавить для добавления другой операционной системы в GRUB.
Из списка выберите раздел диска, содержащий операционную систему, и присвойте ему метку. GRUB будет показывать эту метку в меню загрузки.
- Изменить
Для изменения записи в меню GRUB необходимо выбрать запись и нажать кнопку Изменить.
- Удалить
Для удаления записи из меню GRUB необходимо ее выбрать и нажать кнопку Удалить.
Отметьте флажок По умолчанию напротив предпочитаемого раздела, чтобы выбрать систему, загружаемую по умолчанию. Если вы не выберете образ, загружаемый по умолчанию, вы не сможете продолжить установку.
The Label column lists what you must enter at the boot prompt, in non-graphical boot loaders, in order to boot the desired operating system.
Once you have loaded the GRUB boot screen, use the arrow keys to choose a boot label or type e for edit. You are presented with a list of items in the configuration file for the boot label you have selected.
Boot loader passwords provide a security mechanism in an environment where physical access to your server is available.
Если вы установили загрузчик, рекомендуется определить пароль для защиты системы. Если пароль загрузчика не задан, пользователи, имеющие доступ к компьютеру, могут передать ядру параметры и взломать защиту. Если пароль загрузчика установлен, для изменения его параметров сначала потребуется ввести пароль. Но если у кого-то есть физический доступ к компьютеру, то все же возможно его загрузить с дискеты, CD, DVD или устройства USB при условии поддержки BIOS. План по обеспечению безопасности систем также должен учитывать альтернативные методы загрузки.
Если ваша система находится в безопасном окружении, то есть доступ к ней открыт только авторизованному персоналу, то пароль GRUB можно не задавать. Если же существует вероятность физического доступа к клавиатуре и монитору неавторизованными пользователями, они смогут перезагрузить систему и войти в GRUB. В таких случаях следует задать пароль.
If you choose to use a boot loader password to enhance your system security, be sure to select the checkbox labeled Use a boot loader password.
Once selected, enter a password and confirm it.
Whenever you are required to enter this password, you will also be asked for a username, which is root.
GRUB stores the password in encrypted form, so it cannot be read or recovered. If you forget the boot password, boot the system normally and then change the password entry in the /etc/grub.d/00_header file. Then, run grub2-mkconfig with root privileges to update the grub.cfg file with your updated password. If you cannot boot, you may be able to use the rescue mode on the Fedora installation DVD to reset the GRUB password.
You can later change the username in the /etc/grub.d/01_users file.
When selecting a GRUB password, be aware that GRUB recognizes only the QWERTY keyboard layout, regardless of the keyboard actually attached to the system. If you use a keyboard with a significantly different layout, it might be more effective to memorize a pattern of keystrokes rather than the word that the pattern produces.
To configure more advanced boot loader options, such as changing the drive order or passing options to the kernel, be sure Configure advanced boot loader options is selected before clicking Next.
9.19.1. Advanced Boot Loader Configuration
Now that you have chosen which boot loader to install, you can also determine where you want the boot loader to be installed. You may install the boot loader in one of two places:
Основная загрузочная запись (MBR, Master Boot Record) — рекомендуемое размещение загрузчика, если только в MBR не установлен другой загрузчик операционных систем, например System Commander. MBR — специальная область на диске, которую BIOS вашего компьютера автоматически загружает и передает ей управление процессом загрузки в первую очередь. При установке загрузчика в MBR, сразу после включения компьютера GRUB покажет строку приглашения, откуда можно загрузить Fedora или любую другую настроенную операционную систему.
The first sector of your boot partition — This is recommended if you are already using another boot loader on your system. In this case, your other boot loader takes control first. You can then configure that boot loader to start GRUB, which then boots Fedora.
If you install GRUB as a secondary boot loader, you must reconfigure your primary boot loader whenever you install and boot from a new kernel. The kernel of an operating system such as Microsoft Windows does not boot in the same fashion. Most users therefore use GRUB as the primary boot loader on dual-boot systems.
If you have a RAID card, be aware that some BIOSes do not support booting from the RAID card. In cases such as these, the boot loader should not be installed on the MBR of the RAID array. Rather, the boot loader should be installed on the MBR of the same drive as the /boot/ partition was created.
Если вы будете использовать только Fedora, выберите MBR.
Click the Change Drive Order button if you would like to rearrange the drive order or if your BIOS does not return the correct drive order. Changing the drive order may be useful if you have multiple SCSI adapters, or both SCSI and IDE adapters, and you want to boot from the SCSI device.
If you are installing Fedora from a USB, the boot loader will by default be installed to the MBR on the USB rather than the MBR on the hard drive. This will prevent the system booting once the installation is complete. To avoid this, select Change Device and reverse the order of the BIOS drives. /dev/sda is typically the hard drive and should be first in the BIOS Drive Order.
While partitioning your hard drive, keep in mind that the BIOS in some older systems cannot access more than the first 1024 cylinders on a hard drive. If this is the case, leave enough room for the /boot Linux partition on the first 1024 cylinders of your hard drive to boot Linux. The other Linux partitions can be after cylinder 1024.
In parted, 1024 cylinders equals 528MB. For more information, refer to:
http://www.pcguide.com/ref/hdd/bios/sizeMB504-c.html
Режим восстановления позволяет загрузить минимальное окружение Fedora целиком с загрузочного носителя вместо жесткого диска. Бывают ситуации, когда вы не можете полностью запустить Fedora, и не можете получить доступ к файлам на жестком диске компьютера. В режиме восстановления вы можете обращаться к файлам на жестком диске компьютера, даже если вы не смогли запустить Fedora с этого диска. Если нужно воспользоваться режимом восстановления, это можно сделать следующим способом:
Загрузить компьютер x86, AMD64 или
Intel® 64 с выбранного установочного носителя (CD, DVD, USB, PXE) и ввести в строке приглашения загрузчика команду
linux rescue.
Глава 19, Basic System Recovery содержит подробную информацию о режиме восстановления.
For additional information, refer to the Fedora Deployment Guide.
9.19.3. Alternative Boot Loaders
GRUB is the default bootloader for Fedora, but is not the only choice. A variety of open-source and proprietary alternatives to GRUB are available to load Fedora, including LILO, SYSLINUX, and Acronis Disk Director Suite.
The Fedora Project does not support third-party boot loaders.
Once you have completed all the required sections of the Pre-Installation Hub, click Continue and the installation will begin. How quickly this happens depends on the number of packages you have selected and your computer's speed.
Fedora reports the installation progress on the screen as it writes the selected packages to your system.
For your reference, a complete log of your installation can be found in
/root/install.log once you reboot your system.
While the packages are being installed, more configuration is required. Above the installation progress bar are items that need to be configured for Fedora to be fully installed. These items can be configured either while the packages are being installed or afterwards, but you will not be able to complete the installation process until they have been configured.
When you have configured the required items, click Finish configuration to complete the installation process.
9.20.1. Set the Root Password
Определение учетной записи и пароля root является одним из важнейших этапов установки системы. Учетная запись root подобна учетной записи администратора в Microsoft Windows и используется для установки, обновления пакетов и обслуживания системы. При входе в систему в режиме root пользователь получает полный контроль над системой.
The root user (also known as the superuser) has complete access to the entire system; for this reason, logging in as the root user is best done only to perform system maintenance or administration.
Use the root account only for system administration. Create a non-root account for your general use and use the su command to change to root only when you need to perform tasks that require superuser authorization. These basic rules minimize the chances of a typo or an incorrect command doing damage to your system.
To become root, type su - at the shell prompt in a terminal window and then press Enter. Then, enter the root password and press Enter.
The installation program requires you to set a root password[] for your system. . You cannot proceed to the installation itself without entering a root password.
The root password must be at least six characters long; the password you type is not echoed to the screen. You must enter the password twice; if the two passwords do not match, the installation program asks you to enter them again.
You should make the root password something you can remember, but not something that is easy for someone else to guess. Your name, your phone number, qwerty, password, root, 123456, and anteater are all examples of bad passwords. Good passwords mix numerals with upper and lower case letters and do not contain dictionary words: Aard387vark or 420BMttNT, for example. Remember that the password is case-sensitive. If you write down your password, keep it in a secure place. However, it is recommended that you do not write down this or any password you create.
Do not use one of the example passwords offered in this manual. Using one of these passwords could be considered a security risk.
Чтобы изменить пароль root после завершения установки, можно использовать утилиту настройки пароля root.
Выполните в приглашении оболочки команду system-config-users. Если вы не являетесь пользователем root, для продолжения будет предложено ввести пароль root.
Enter the root password into the Root Password field. Fedora displays the characters as asterisks for security. Type the same password into the Confirm field to ensure it is set correctly. After you set the root password, select Back to return to the Pre-Installation Hub.
9.21. Installation Complete
Congratulations! Now that you have configured the remaining settings, your Fedora installation is now complete!
Click Reboot to reboot your system and begin using Fedora. Remember to remove any installation media if it is not ejected automatically upon reboot.
After your computer's normal power-up sequence has completed, Fedora loads and starts. By default, the start process is hidden behind a graphical screen that displays a progress bar. Eventually, a login: prompt or a GUI login screen (if you installed the X Window System and chose to start X automatically) appears.
The first time you start your Fedora system in run level 5 (the graphical run level), the FirstBoot tool appears, which guides you through the Fedora configuration. Using this tool, you can set your system time and date, install software, configure your machine to receive software updates, and more. FirstBoot lets you configure your environment at the beginning, so that you can get started using your Fedora system quickly.